A one-off Daytona SP3 Tailor Made has been sold at the RM Sotheby’s Monterey auction. Now, a regular SP3 would fetch around $5-6 million at auction. This one, though, was a bit special and went for an insane price of $26 million! The good thing is that all the proceeds from the sale will benefit ‘The Ferrari Foundation’.
The special Daytona SP3 features a two-tone carbon fibre finish and Giallo Modena bodywork. The front splitter, sills and rear diffuser are finished in gloss black.
One of the unique design elements is the Ferrari logotype in Giallo Modena that occupies the complete upper body. It’s the first time that the Ferrari logo has been applied to a livery in this way.
The interior of this Daytona SP3 is trimmed in an innovative fabric derived from recycled tires. The dashboard and steering wheel are made from a type of carbon fibre used in Formula 1.
Now, the Daytona SP3 was a limited-edition model with only 599 units produced. This one, though, will be numbered 599+1, as the planned production is already sold out.
The Daytona SP3 is powered by a heavily modified V12 engine that powers the 812 Competizione. The 6.5-liter unit has been tuned to produce 829 hp and 697 lb-ft of torque and comes paired with a 7-speed dual-clutch transmission. It can do 0-62 mph in 2.85 seconds and the top speed is 211 mph.
Whether you’re a local, a “washashore” (the term locals use for those not originally from here), or just a curious day-tripper, Provincetown—at the outermost point of Cape Cod—has long beckoned visitors. This hub for the whaler, the fisherman, the eclectic, and the LGBTQIA+ community is ever-evolving, ever-inviting, and a guaranteed backdrop for a great time regardless of the length of your stay.
While you can easily fill a weeklong itinerary of things to do, tan, eat, and sip in Ptown, this slice of New England paradise can also be enjoyed in a single day by those looking for a more efficient experience. From linguiça breakfast sandwiches (a nod to the local Portuguese community) to afternoon “tea dance,” we have you covered for the perfect day in Ptown—plus a few suggestions in case you decide to take your time and conveniently “miss” the last ferry to Boston. (I’d totally understand if you did.)
How to Get There
There are two fast ferry lines running from Boston to Provincetown, with Bay State Cruise Company offering a slightly earlier (8:30 a.m.) departure from Boston’s Seaport neighborhood, while Boston Harbor City Cruise offers a 9 a.m. departure from Long Wharf in downtown. On the return, BHCC offers a later 9 p.m. sailing back to Boston on summer weekends, while Bay State operates daily 7:30 p.m. returns.
Arrival
Macmillan Pier in Provincetown, Cape Cod.
Taku Sanada/Getty Images
The earliest fast ferry from Boston arrives shortly after 10 a.m. If you’re visiting during the peak summer season, there’s a good chance half the town is still asleep from the night before, while the other half have been up since dawn, strolling the shoreline or powering through cardio regimens on Commercial Street—Ptown’s main thoroughfare of galleries, shops, bars and restaurants.
Thanks to the ambitious early risers, it’s wise to make a beeline for Liz’s Café Anybody’s Bar, the town’s go-to spot for the first meal of the day, where you’re almost certain to be privy to the tea du jour (and I don’t mean of the Earl Grey varietal) rustling the town’s lace curtains that week. Linguiça breakfast sandwiches served on a Portuguese muffin, as well as flippers (a Portuguese fried dough), share space on a menu of breakfast classics, lobster eggs benedict, and morning cocktails.
Bike to the Beach
The Old Harbour Life Saving Museum on Race Point Beach.
DenisTangneyJr/Getty Images
Once you’re filled up with gossip and eggs, the town is truly your oyster. (Pro-tip: maybe hold off on imbibing on those until a late lunch.) Two blocks east of Liz’s is Ptown Bikes, where you can rent cycles and enjoy a scenic couple hours pedaling though the Provincetown stretch of Cape Cod National Seashore, working off breakfast as you go.
Herring Cove Beach and Race Point Beach are two of Provincetown’s most beloved sandy stretches, connected via a bike and walking path through the dunes of the National Sea Shore. Herring Cove is closer to town and known for calmer waters, while Race Point directly faces the Atlantic Ocean and offers more crashing waves and taller dune backdrops to your beachside photo session.
Once you’re done basking in the sun and sand, coast through the West End for a self-guided tour of fabulous homes and historic architecture on your way back into town.
Lunch, Culture, and Shopping
Those feeling hungry after all the pedaling might want to stop into Pop+Dutch for sandwiches that are as delicious as their names are creative. The Celine Dijon (French ham, Swiss cheese, Dijon mustard, cornichons, and brown butter on French baguette) is a fan favorite—and often sells out early to those who can hit the high note of “All By Myself” … or at least try their hardest each time it comes on Spotify.
If you’re in more of a sit-down mood, Pepe’s Wharf, toward the East End, is a slightly more upscale venue to enjoy frozen cocktails, oysters, and fried seafood with a harbor view. Meanwhile, The Canteen is the town’s (dog-friendly) haven for lobster rolls, frozen rosé, and crispy Brussels sprouts, best enjoyed in the backyard that spills right onto the beach.
People walk past the colorful homes and shops on Commercial Street.
Dee/Getty Images
But also be sure to save a little time for post-lunch culture and a bit of splurging. Dive into Provincetown’s history (and its bragging rights of being the first landing spot for the Pilgrims, who signed the Mayflower Compact here before continuing to what became Plymouth) at the Pilgrim Monument and Provincetown Museum. It’s accessible via an inclined elevator tucked behind Town Hall on Bradford Street.
For those whose idea of culture is more of the shop-‘til-you-drop variety, Provincetown delivers. Art galleries, boutiques, and quirky gift shops abound up and down Commercial Street. More than 40 art galleries cater to collectors of every taste, while shops like Marine Specialties (where you can score anything from a Provincetown T-shirt to a decommissioned airline seat) offer a uniquely Outer Cape experience. Gift shops like Womencrafts highlight work by women artists, while Tim-Scapes puts a more modern spin on vintage travel posters and sells Ptown-themed apparel.
Late Afternoon Revelry
As the afternoon winds down, those looking for a refined cocktail or early dinner before the ferry should head to The Red Inn, a crimson-hued waterfront favorite on Ptown’s western edge. Known for its “teatini” (a bold and flavorful Earl Grey tea-infused gin cocktail) and glowing golden hour views, it’s an ideal pre-departure stop.
Those looking to sip and savor closer to the town center and MacMillan Pier are in for a marquee dining moment. Ceraldi, long one of the toughest reservations on the Outer Cape, made its triumphant return to Ptown this summer after years in Wellfleet, where it began life here as a pop-up. The new location still serves chef Michael Ceraldi’s signature seven-course tasting menu of hyper-seasonal, hyper-local ingredients from both land and sea. Now, diners can also opt for a more casual bite, thanks to an abridged menu of soup, salad, and pasta or the Artist’s Special: “one course in time and place.” If you’re gauging what you have time for before it’s all aboard on the last ferry back to Boston: the restaurant recommends allotting 2.5 hours for the tasting menu and 1 hour and 15 minutes for the three-course offering.
Also, closer to the center of town, the Pop + Dutch team debuted Ladyslipper, an “elegant … for Provincetown” (their words, not mine) cocktail bar this summer. It’s already a hit among those jonesing for elevated yet low-commitment bar bites. (The “Rotating Caesar Something” adds intrigue to the savory side of things, while you can’t go wrong with the mysterious “A Fruit Something,” “A Custard Situation,” or “A Chocolate Requirement” on the sweets lineup.) Be strategic with the curated cocktail list, as the vodka, cold brew, espresso, and vanilla-laced “Disco Nap” is perfect fuel for the dance floor.
Speaking of: the see-and-be-seen (and sometimes costumed) moment begins each afternoon closer to the center of town at Boatslip Resort & Beach Club, home to Ptown’s legendary afternoon “tea dance.” Kicking off daily at 4 p.m., it’s part dance party, part social hour, and the perfect place to debrief the day and plot the night ahead.
Farewells … or Just Getting Started?
Speaking of which, tea wraps at 7 p.m.—just in time to catch the last ferry back to Boston. If you’re power-walking down Commercial Street, you might be able to squeeze in one last lobster roll to go from The Canteen before boarding at MacMillan Pier. But if you just happen to miss that final departure? Well, consider it fate.
The Red Inn, the Brass Key Guesthouse and AWOL are all luxe options for an overnight stay before the morning ferries depart. Besides, missing the ferry might just be the best thing that happens all day. As any local—or washashore like yours truly—will tell you: Provincetown truly comes alive after dark. But that’s a whole other story …
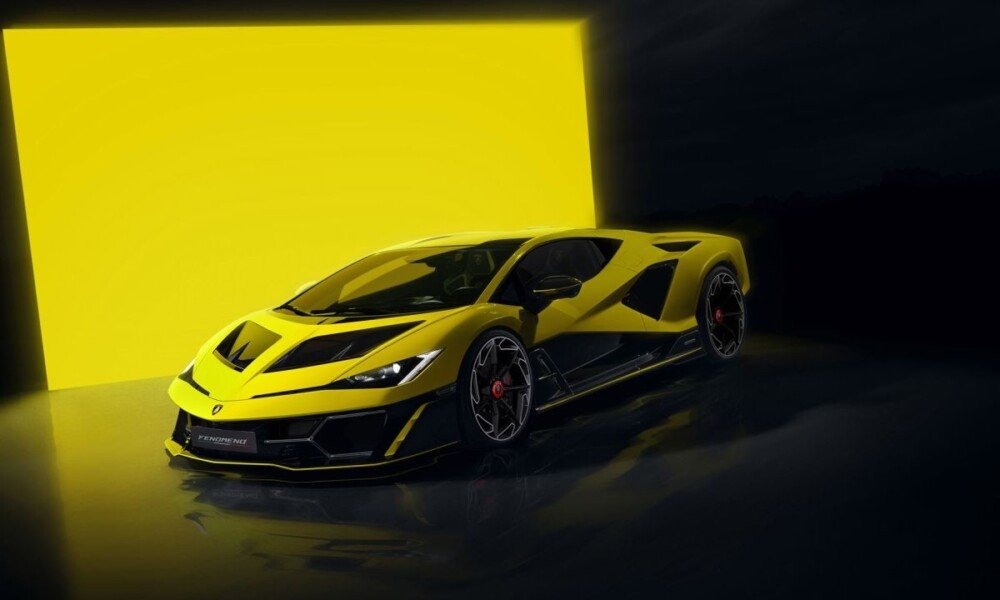
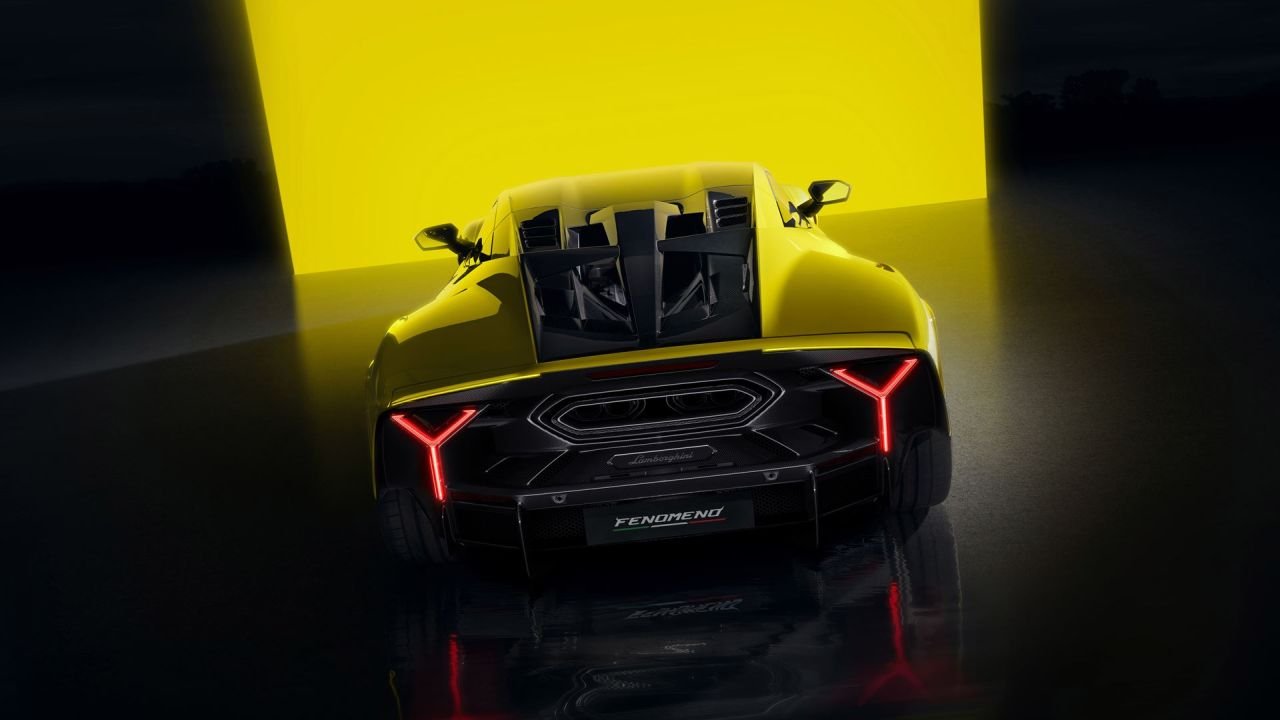
Lamborghini has officially unveiled its newest limited-edition supercar at The Quail. It’s called the Fenomeno, and is said to be “the ultimate expression of Lamborghini’s tradition of limited-edition vehicles”, starting with the Reventon, Sesto Elemento, Veneno, Centenario, Sian and Countach.
The Fenomeno is based on the Revuelto. While it is powered by the same V12 hybrid, it has been tuned to produce 1065 hp and 793 lb-ft of torque, which makes it the most powerful Lambo ever. It also boasts a larger 7 kWh lithium-ion battery, which gives it an electric range of 12.4 miles.
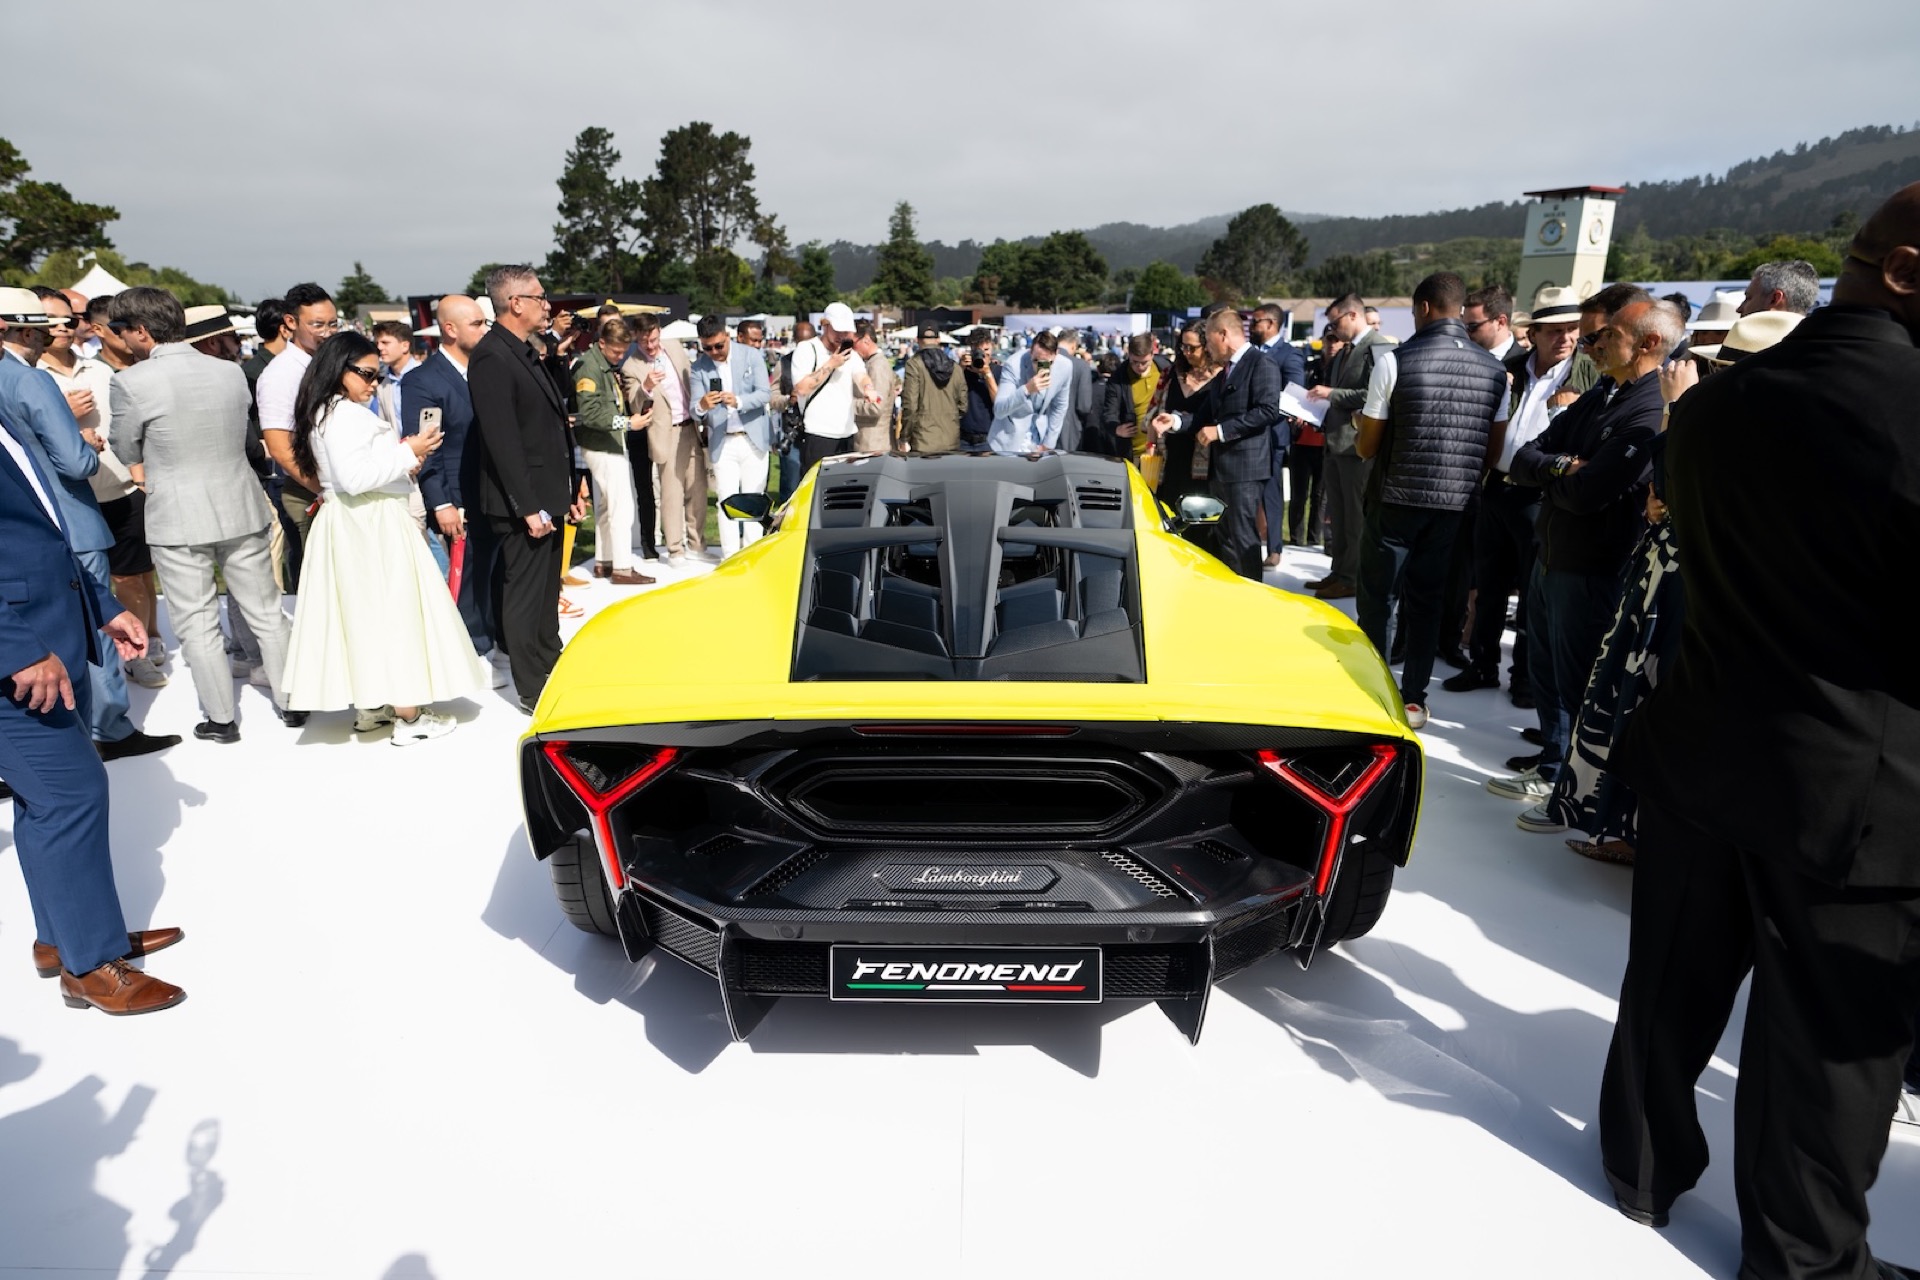
The front fascia looks like a more extreme interpretation of the Centenario. It has massive triangular ducts on the sides and a bespoke rear end with Y-shaped taillights. The car rides on 21-inch wheels at the front and 22-inch wheels at the back.
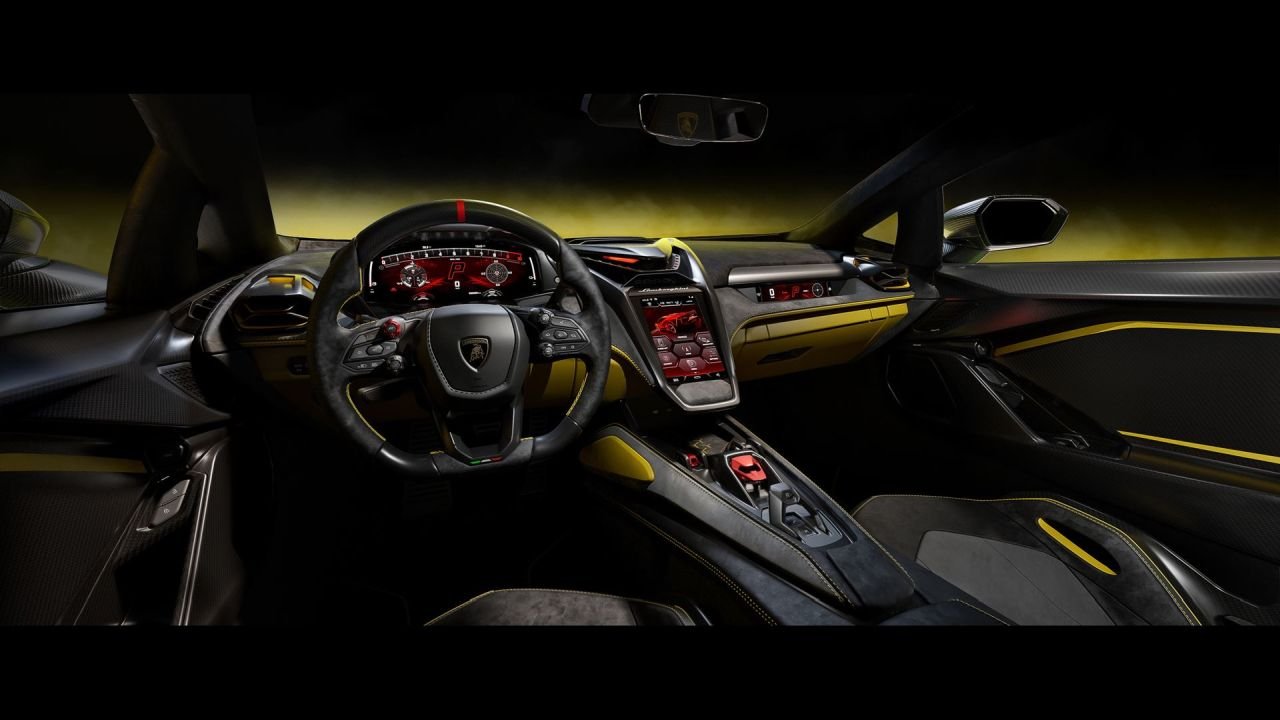
The interior, though, is similar to the Revuelto and features a portrait-oriented screen in the centre, the new 3-spoke steering wheel wrapped in Alcantara and a digital dash.
Lamborghini is building only 29 examples of the Fenomeno. It comes with a price tag of $3.5 million.
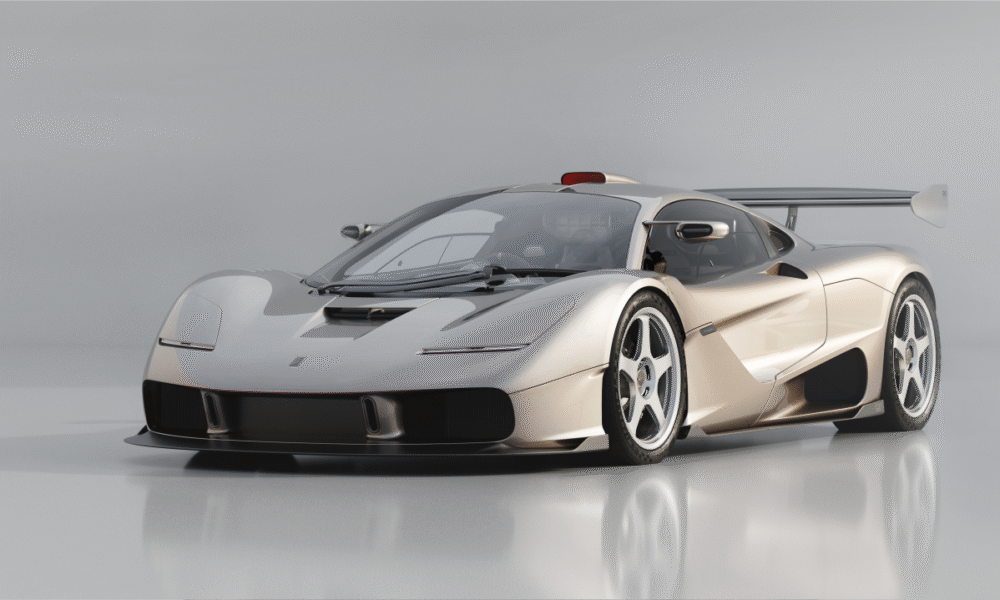
Gordon Murray Special Vehicles (GMSV) has revealed the S1 LM at The Quail.
The GMSV S1 LM is the first ever commission executed by Gordon Murray Special Vehicles, hence the name ‘S1’, which stands for ‘Special One’.
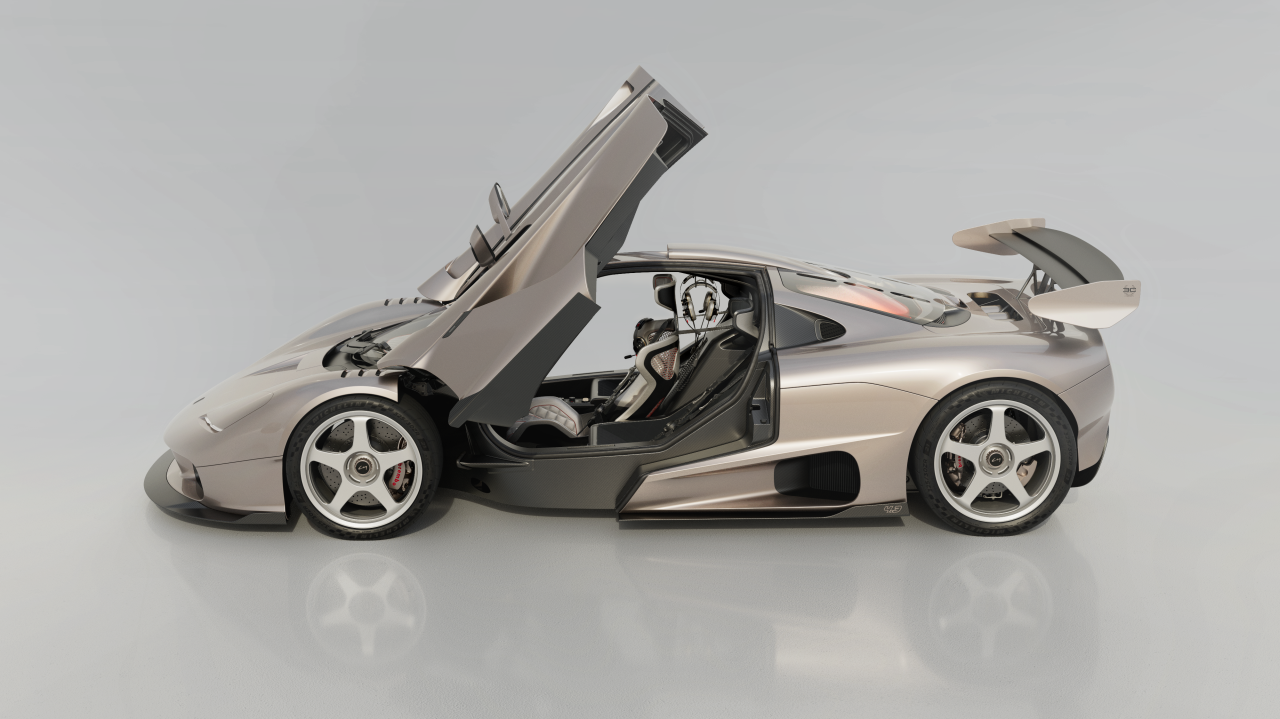
The S1 LM pays homage to Gordon Murray’s original Le Mans-winning race car. It features a newly lowered roofline, a bespoke front splitter, a rear diffuser, and a dual-element rear wing. It has ultra-lightweight carbon fibre body panels and Le Mans-inspired lights. The car has a race-inspired cockpit with a central driving position.
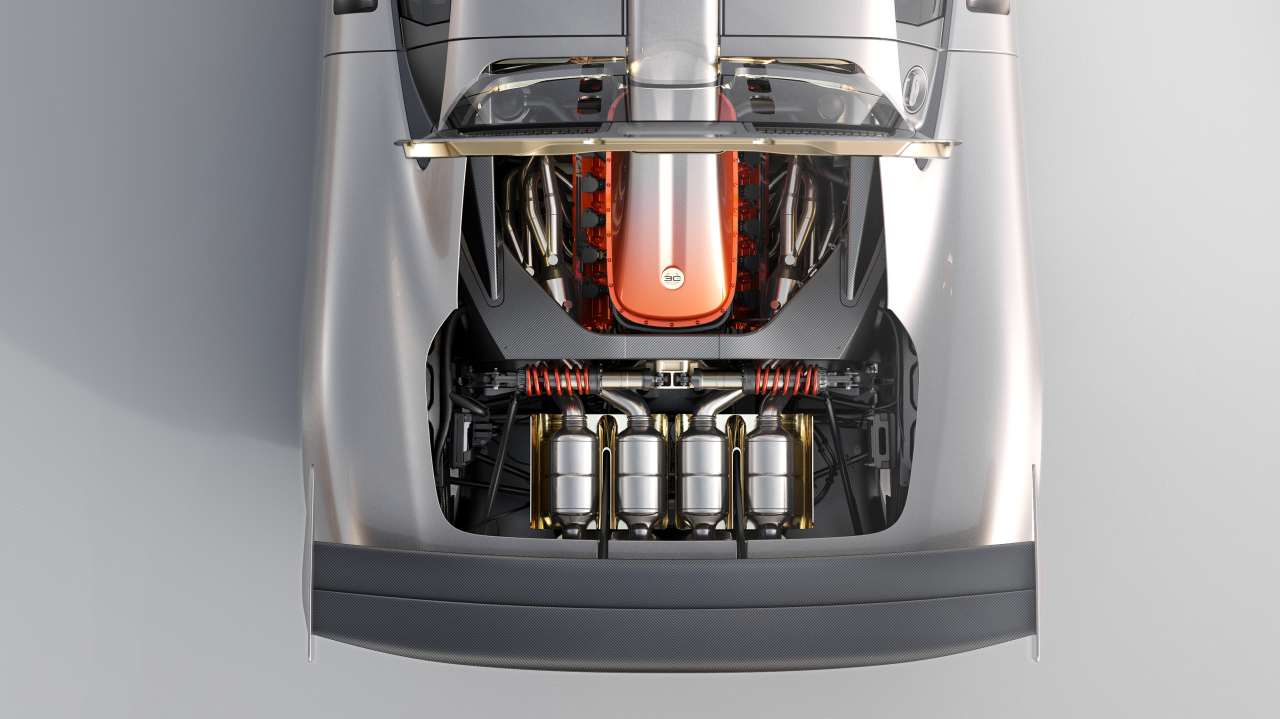
The S1 LM does not have the rear-mounted ground-effect fan like the T.50, which frees up space for the larger 4.3-liter V12 engine. It revs to 12,100 rpm and makes over 700 hp.
The S1 LM comes with a manual gearbox and has a bespoke suspension setup. It has a lower ride height compared to the T.50 and a bespoke damper setting.
GMSV is building only 5 examples of the S1 LM. The price hasn’t been revealed, but we’re guessing most will already be spoken for. Deliveries will begin in 2026.
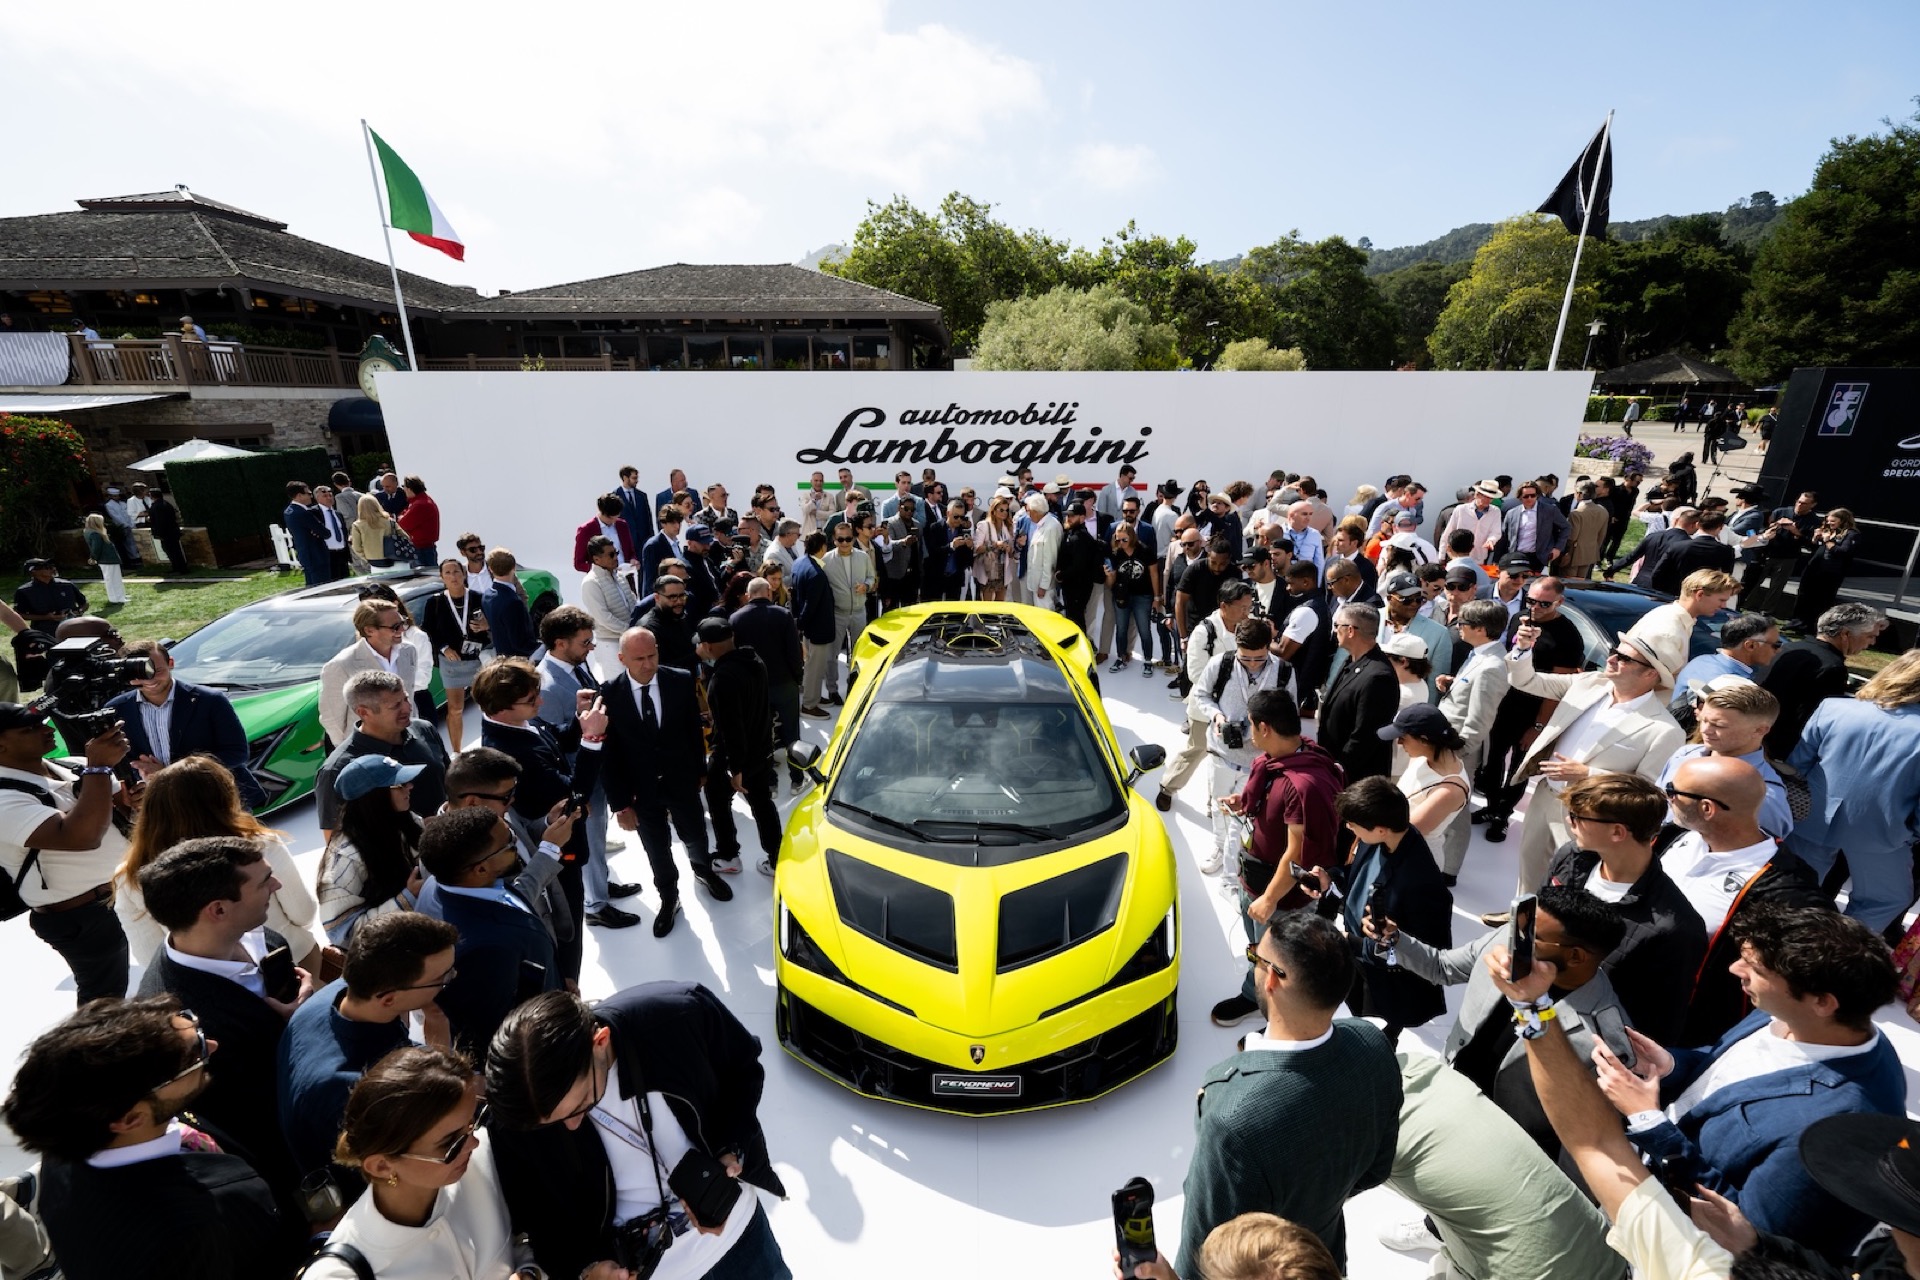
For Lamborghini, The Quail is the holy grail of luxury car events. The brand traditionally uses this exclusive Monterey Car Week gathering to debut its latest halo models—and this year is no different. Enter: the Lamborghini Fenomeno.
Bathed in sunlight, Lamborghini CEO Stephan Winkelmann strides confidently onto the stage. Each marque gets just seven minutes to present its latest to the moneyed crowd, and not even Lamborghini is exempt. Yet the North Italian supercar maker rarely misses its moment. The cover is pulled back, revealing the wild, bright yellow Fenomeno crouched on the pristine white stage. Applause follows. The price? Over €3 million per car, all of them tailor-made.
Packing 1,080PS from a combination of a naturally aspirated 6.5-litre V12 and three electric motors, the Fenomeno is the fastest and most powerful Lamborghini ever built. Thanks to all-wheel drive and 725Nm of torque, 0–100 km/h is dispatched in just 2.4 seconds. Top speed? North of 350 km/h. “All 29 units we will build have already been sold,” says Winkelmann proudly. He joined Lamborghini exactly 20 years ago and has since overseen a transformation—five times more staff, and seven times more cars built, all eagerly snapped up. The Revuelto, on which the Fenomeno is based, is sold out until the end of 2027.
The Fenomeno is the ninth model in Lamborghini’s Few-Off series, where exclusivity is the core mission. “When we launched the Reventón in 2007, the goal was to create a truly extraordinary supercar—one that represented the ultimate expression of Lamborghini,” Winkelmann explains. “This new Few-Off continues that philosophy of uniqueness and innovation, which lies at the heart of our DNA.”
Named after a victorious bull from the fighting arena, the Fenomeno delivers its colossal power via a hybrid powertrain: an 835PS V12 that revs to 9,500rpm, and three electric motors adding a further 245PS. Torque peaks at 725Nm at 6,750rpm, with 80% available from just 3,500rpm. The combustion engine powers the rear wheels, while two 110kW motors feed the front axle, and a third radial-flux motor sends additional torque to the rear depending on the selected drive mode. Whether in silent stealth or full-throttle fury, the Fenomeno offers electric precision with old-school theatre. Unlike the Revuelto, the Fenomeno features a newly developed 7.0kWh battery, neatly integrated within the central tunnel.
Braking comes courtesy of Lamborghini’s CCM-R Plus system, with carbon-ceramic discs tuned for both road and track. But while the Fenomeno shares its basic architecture with the Revuelto, its chassis is completely bespoke—borrowing components from a future GT3 racing derivative.
Damping is manually adjustable, not electronically controlled, offering compression and rebound settings tailored to the driver’s intent. It also features a new suspension-to-tyre size ratio, running 265/30 ZRF21 fronts and 355/25 ZRF22 rears.
Yet beyond the hardware, Lamborghini’s design team has made bold strides. “With the Fenomeno, we are opening a new chapter in our unmistakable, forward-thinking design language,” says design chief Mitja Borkert. “It follows the same authentic and highly recognisable design principles that began with the original Countach LP500.” At 5.01 metres long, the Fenomeno is both a design statement and a brutal piece of rolling performance art.
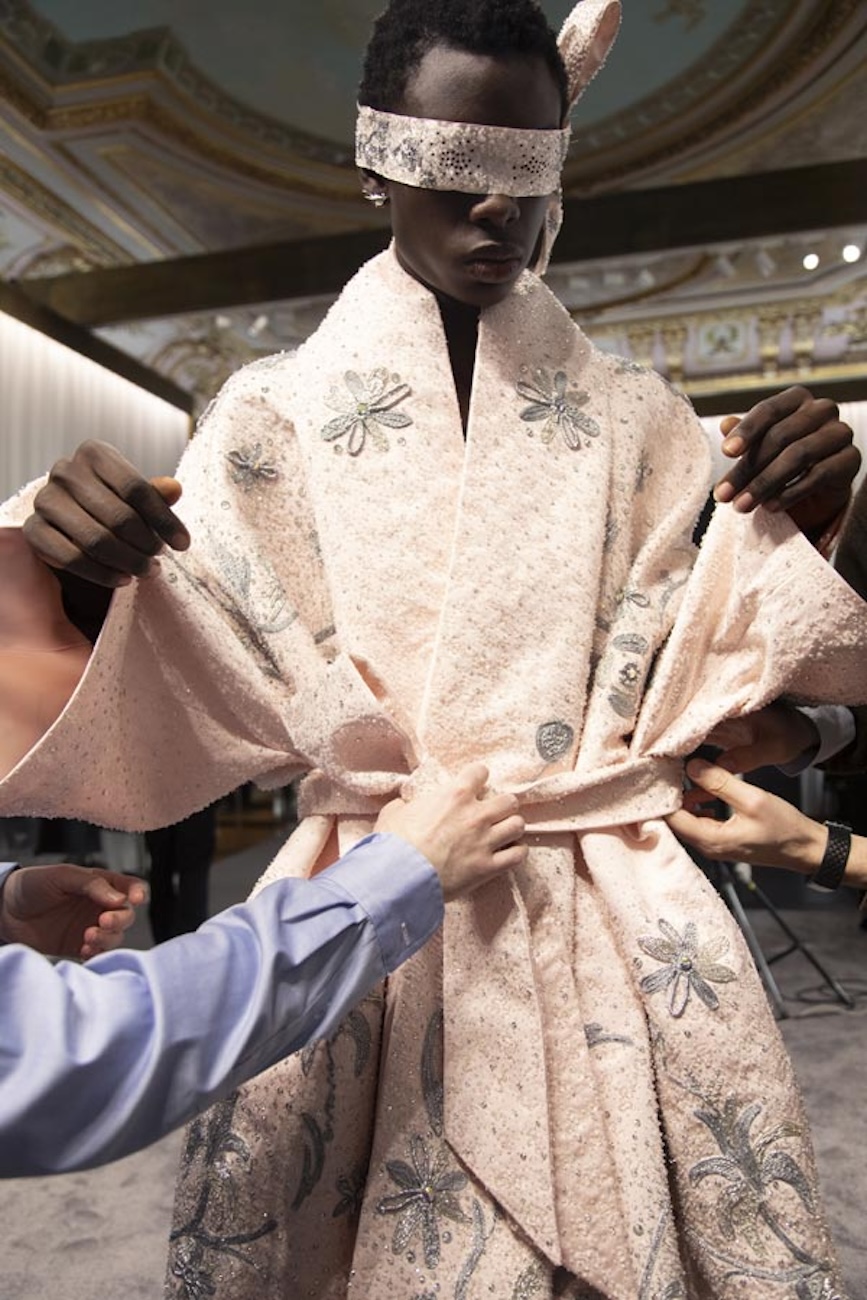
Kimono coat, jumpsuit, mask and earrings, DIOR MEN (ALFREDO PIOLA)
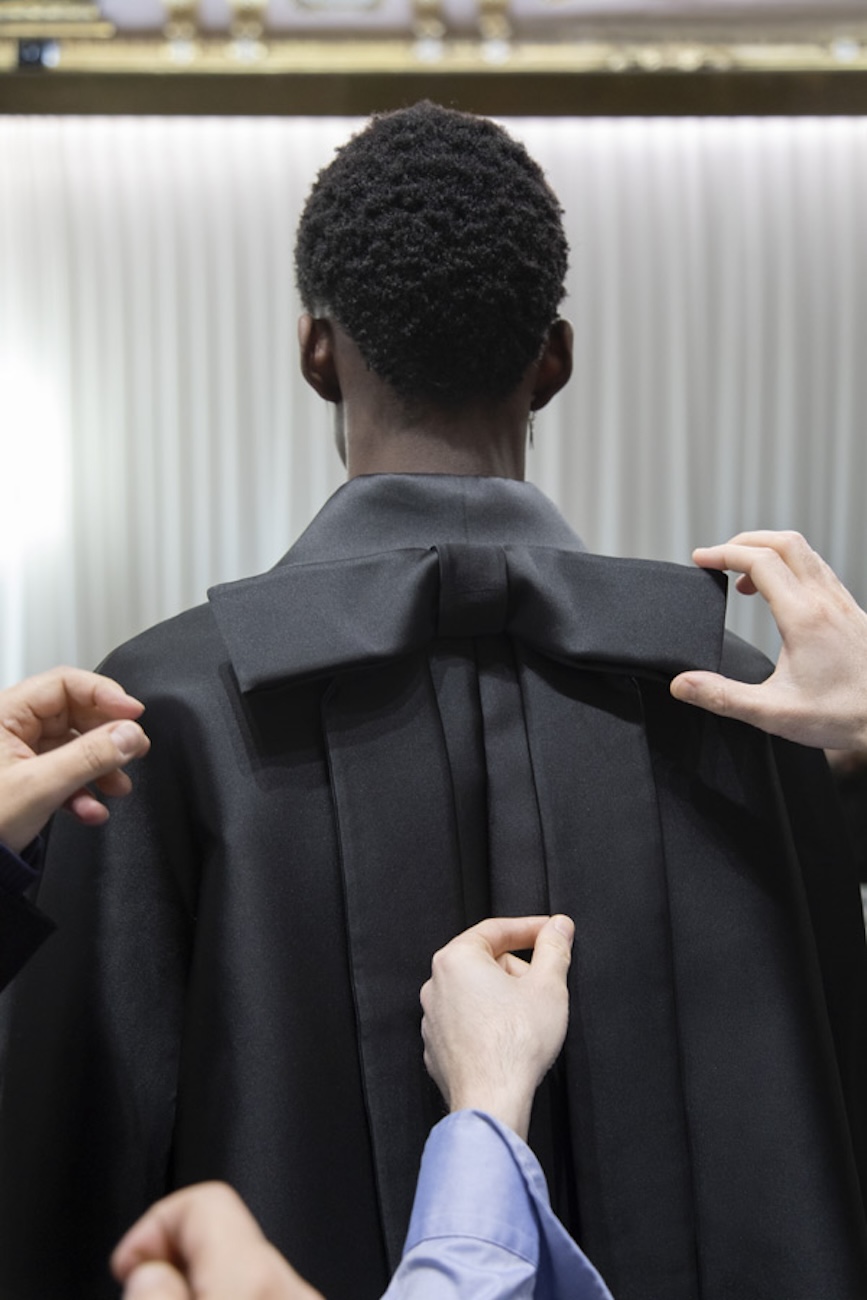
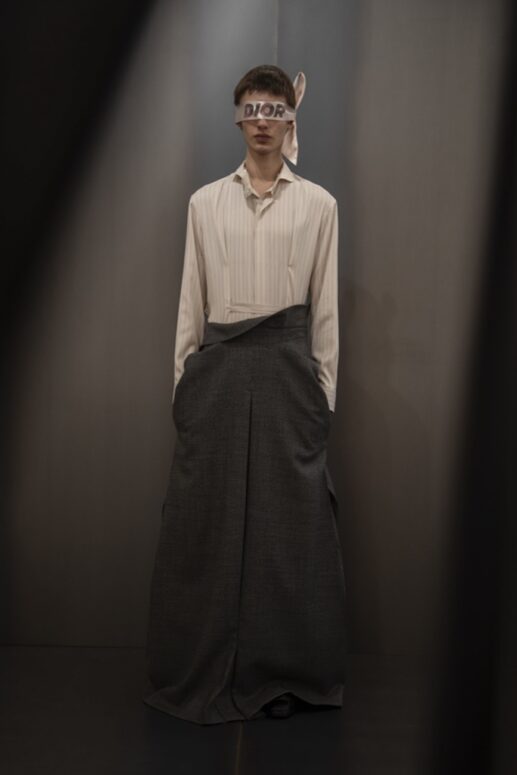
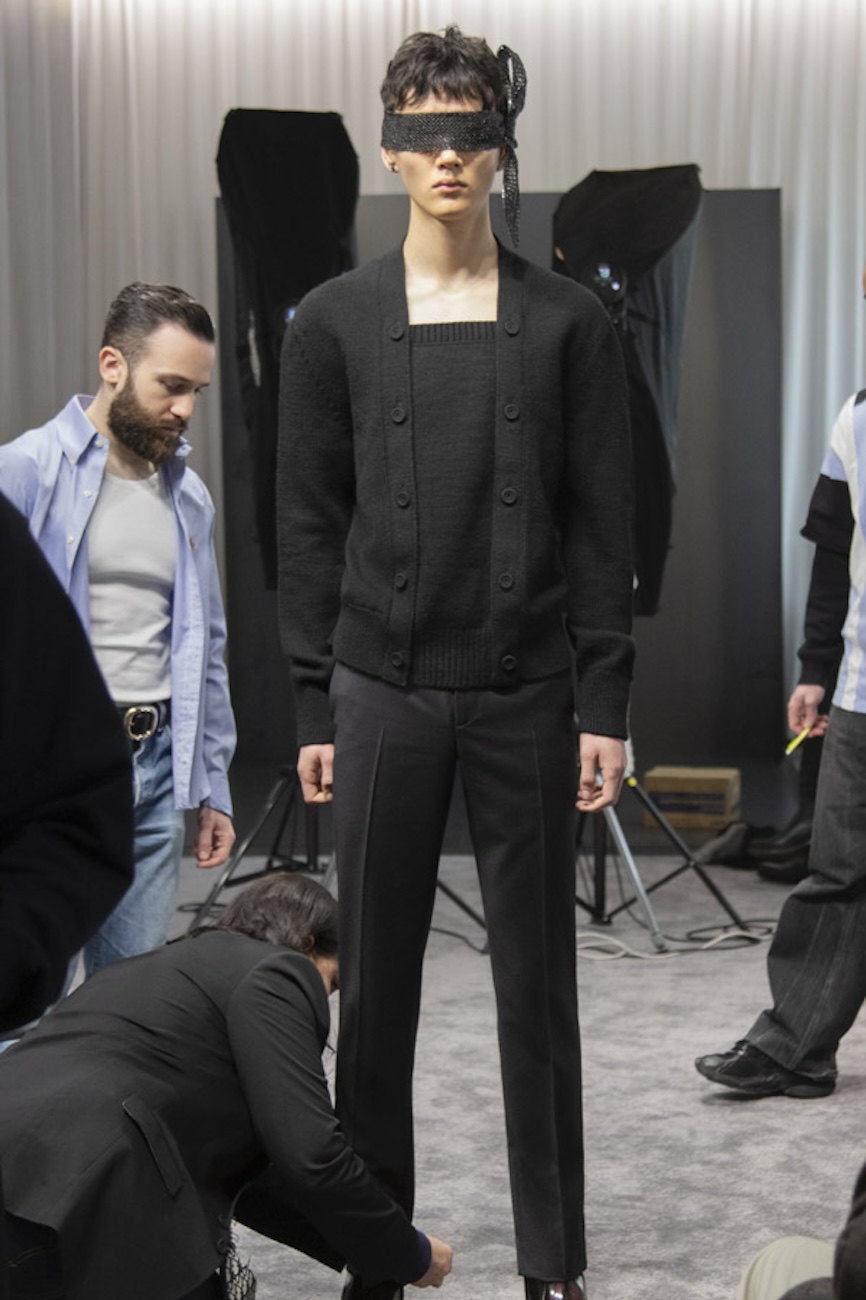
There was mystery from the very first look in the Dior Men Winter 2025 runway show. Dressed entirely in black—turtleneck worn with trousers constructed with draped precision—the model appeared to be blindfolded with a satin bow to the side. The bow turned out to be a recurring element throughout the collection, a nod to the haute couture icon of Dior. While the couture bow blindfolds were instant style standouts (including one branded with “DIOR”), bows were also employed to adorn the backs of coats, fasten detachable sleeves, and cover toe caps of a range of footwear.
Coat with removable bow, DIOR MEN (ALFREDO PIOLA)
“Mr Dior’s Ligne H was in our heads even before going into the archive this season,” says Kim Jones in the collection’s notes. “It has elements that are graphic and angular, which felt eminently transferable into the men’s world. We believed it was time to focus on Mr Dior again. We wanted to go back to the roots and concentrate on the quintessence of the House. There is a sense of fashion history, particularly the history of menswear, running through this collection. The shift from something quite ornate and extravagant in the 18th century to something more linear and utilitarian in the 19th, with the beginnings of modern menswear. Yet, while a lot refers to the history of fashion, this is not historical fashion. Ultimately, in this collection, we wanted to say something about now.”
Coat, shirt, trousers, mask, earrings and boots, DIOR MEN (ALFREDO PIOLA)
To those of us who have been following Jones’ work at Dior, “now” can also be considered as the culmination of his time at the House. From his very first Dior Men collection, Jones has not only meticulously pored through the House’s archives and heritage for references, he has also reiterated a sense of elegance that is closely associated to Dior as a fashion house. The Dior Men Winter 2025 collection takes it up a notch by embodying the Casanova theme but interpreted as the duality of a “ladies’ man”. Feminine nuances derived from women’s haute couture have either been masculinised or, like that of the aforementioned first look, adapted and styled with more masculine ready-to-wear pieces.
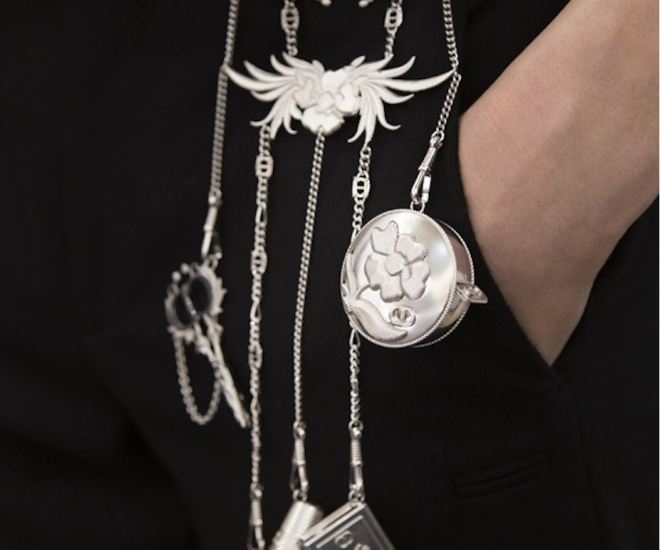
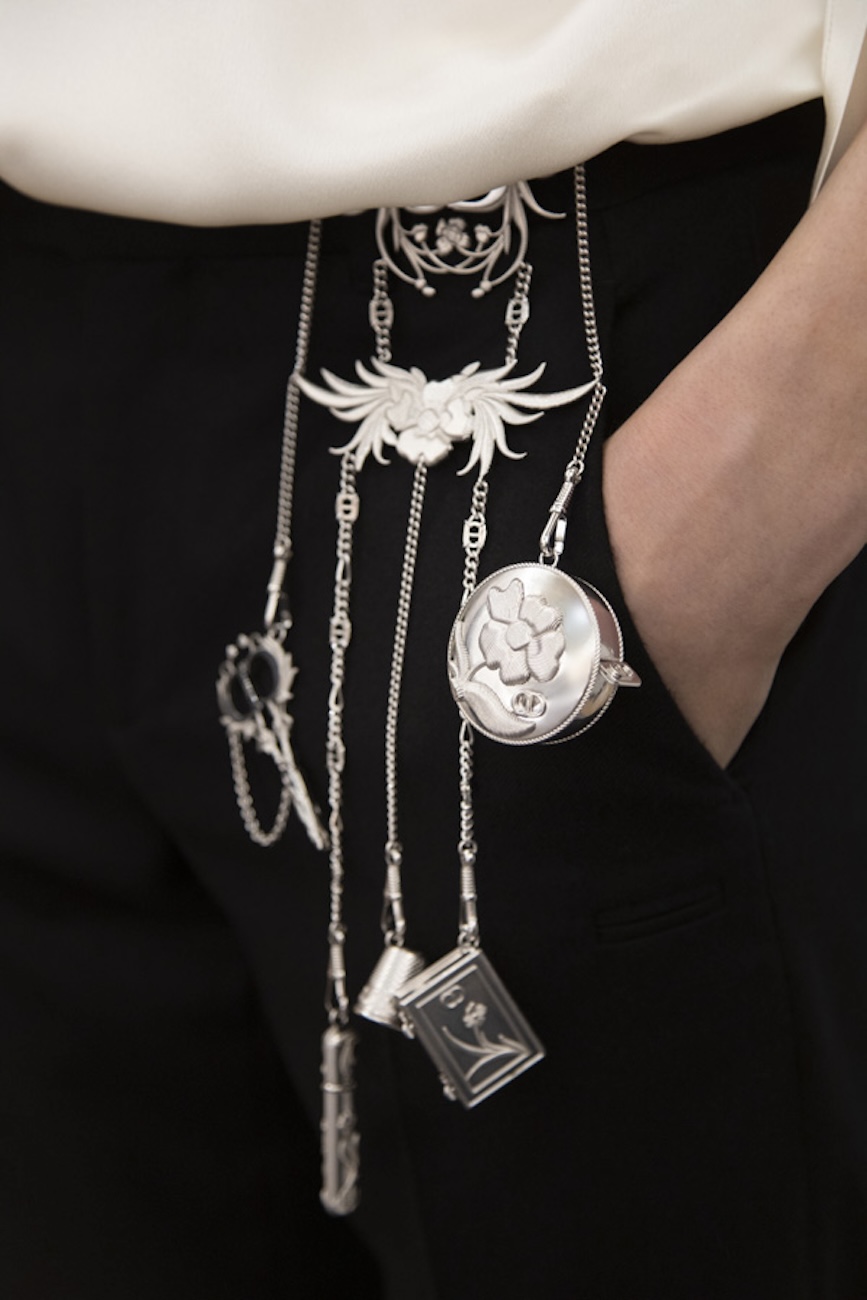
Top, trousers and chatelaine, DIOR MEN (ALFREDO PIOLA)
Elegance comes in many forms throughout the collection. Voluminous constructions (once more, inspired by women’s haute couture) are juxtaposed with streamlined pieces as a way of introducing drama while exuding a touch of the excesses of 18th-century fashion. Robes and opera coats, for example, are belted to further emphasise their decadent use of materials. Silks and satins are used for their noble finish and luxurious sheen, especially on the collection’s more pared back silhouettes. Embroidery taken from the Dior Spring/Summer 1948 haute couture collection is recreated on the collection’s closing look—an impressive pink kimono coat with matching mask—and informs the embellishments seen in the rest of the pieces. A sterling silver chatelaine borrows motifs from the archival embroidery, while collar inserts on shirting feature embroidered trims.
Cardigan, trousers, mask, earrings and boots, DIOR MEN
(ALFREDO PIOLA)
The Dior Men Winter 2025 show may have started with a mysterious dramatic flair, but the next day at the collection’s resee, there was a palpable excitement as editors and clients fawned over the looks up close. Jones, intentionally or not, managed to tap into what we all want in menswear: unrestrained elegance brought about by simply beautiful fashion. And it’s something that he has continuously brought forth at Dior Men; but with this collection, even more so.
Hennessey Special Vehicles has brought a one-of-one hypercar to The Quail this year – a 2000+ hp Venom F5 with a manual gearbox!
The Venom F5 Revolution LF was created by Hennessey’s new bespoke customer commission division: ‘Maverick’, at the request of American entrepreneur and collector Louis Florey.
The Venom F5 Revolution LF is based on an all-new carbon fibre monocoque and features the latest Evolution package and the open-top F5 in track-spec ‘Revolution’ configuration. The exterior is finished in River Sand Metallic with an exposed carbon central section, making it the most unique F5 spec to date.
The LF also features an updated aero package, which includes a new front splitter, reshaped dive planes, re-sculpted fender louvres, a new rear deck with an integrated lip spoiler and a taller rear wing.
Inside, Hennessey promises improved ergonomics and a tweaked driving position. It comes with machined aluminium pedals in a new floor-mounted configuration. The H-pattern gated shifter is milled from solid aluminium.
Powering the Venom F5 LF is Hennessey’s new 6.6-liter twin-turbo V8 that pumps out 2031 hp. It is paired with a 6-speed manual transmission, which drives the rear wheels. It also gets a new suspension setup.
A 2017 LaFerrari Aperta was offered for sale at RM Sotheby’s Monterey auction recently. The winning bid was $6.1 million, which, after adding all the fees, comes to $6.7 million!
As you are aware, the LaFerrari Aperta is rare and more sought after compared to the coupe. Only 210 examples were built, and prices have skyrocketed over the years.
This US-spec LaFerrari Aperta is chassis no. 232856 and has less than 2,300 miles on the clock. It is finished in Nero Daytona with Rosso pinstripes. It rides on gloss black wheels with red brake calipers.
The interior is lined in Nero leather with red accents and is equipped with over $113,000 in options. These include a carbon and Alcantara steering wheel, a carbon fibre hardtop and a carbon fibre exterior package.
The 6.3-liter, naturally-aspirated V12 engine, along with the HY-KERS hybrid system, produces a combined output of 950 hp and 664 lb-ft of torque. It enables the Aperta to accelerate from 0-60 mph in 2.4 seconds.
It’s worth noting that the MSRP of this 2017 LaFerrari Aperta was $2.3 million. It just shows how much these cars have appreciated over the years.
Before I became a Travel + Leisure editor, I worked as a travel agent for five years. Along with planning dream vacations, I would also offer packing advice to clients who were unsure about what to bring along on their European getaways. Summer is high season in Europe—in fact, I just returned from a trip to Paris myself. As an overpacker, I know the struggle of packing light, but it’s better to curate your suitcase space ahead of time to avoid wasting space on things you won’t use.
I’ve thought about what my clients used to ask me as we planned every step of their journey, from what size baggage they would need on their international flight to voltage standards abroad to how to dress in different European cities. Here are some tips from a former travel agent on what to pack for your next trip to Europe, along with what to leave behind, all available at Amazon from $8.
Smart Packing Swaps for Europe
Don’t: Pack a carry-on that’s too large
Instead: Bring a hybrid bag that will fit in smaller overhead bins
Amazon
Small flights between European cities or on budget airlines often have more limited overhead bin space for carry-ons. Airlines will sometimes even measure your bag to enforce the size restrictions. I’ve had many clients who try to avoid checking a bag at all costs, so I would recommend getting a compact, malleable bag like this Osprey hybrid, which you can wear as a duffel or a backpack. I personally find it easier to wear a backpack when traveling to Europe to avoid lugging heavy suitcases onto trains or over bumpy cobblestone alleyways.
Don’t: Pack a bulky wallet
Instead: Bring a slim travel pouch
Amazon
Even if you carry a brick of a wallet at home, it’s best to pare it down to just the essentials when traveling, and get a slim travel wallet to slip into your purse or front pocket. I think the minimalistic design of this pouch is perfect for holding a few credit cards, cash, and even coins. If your hotel has a physical key, you can attach it to the key ring or use that to secure it to a key leash inside a travel bag to keep it secure. The fabric is also waterproof and has RFID protection. It comes in more than 40 colors; I personally love a bright color, so you can find it quickly inside your bag.
Don’t: Pack heavy books
Instead: Bring an e-reader
Amazon
I’ll admit I usually prefer a hard copy of a book over an e-reader, but there have been many times when I’ve regretted packing multiple books. I never know exactly how many I’ll need, and they end up getting ripped and bent in my luggage. Plus, I hate to be that person on a plane who has their overhead light on when everyone else is trying to sleep. It’s much more convenient to bring a Kindle while traveling because of the slim design, adjustable light settings, and access to a library full of books.
Don’t: Pack jean shorts or frumpy sweatpants
Instead: Bring a versatile maxi dress
Amazon
My clients traveling abroad for the first time would ask me about what to wear in major European cities like Paris or Rome, and I would recommend leaving the short shorts or frumpy sweatpants at home, as locals tend to dress a bit more formally. There’s no need to buy a whole new wardrobe, but it’s worth it to stock up on a few versatile pieces. You can’t go wrong with this easy-to-wear dress that will keep you cool but still covers your knees and shoulders in case you plan to visit any old churches.
Don’t: Pack an open-top purse
Instead: Bring a crossbody with a secure zipper
Amazon
While you may not think twice about using an open-top bag at home, you should be more cautious about traveling with this type of purse in any big city because it’s too risky for potential thieves to reach right into your bag in crowded spaces. Instead, opt for a more secure purse like this anti-theft messenger bag, which has a zipper at the top, locking compartments, slash-resistant material, and RFID-blocking panels. I also love the mesh water bottle pockets so you can stay hydrated while on the go.
Don’t: Pack heels (you won’t wear them)
Instead: Bring comfortable flats
Amazon
Many European cities have cobblestone streets, which are charming and beautiful but also difficult to walk on. Any time I pack heels, I never wear them, and I always wish I had flats instead. Stilettos are going to slow you down, and they’re inevitably going to get stuck in the street cracks, so look for a pair of versatile flats that you can walk for miles in and then wear to dinner at the end of the day. These chic Vivaia flats are made from a breathable knit material, and they have an adjustable strap. They come in more than a dozen colors, and they’re machine washable.
Don’t: Pack a heavy tumbler
Instead: Bring a collapsible water bottle
Amazon
As much as I love my emotional support water bottle, it’s way too big to travel with and would probably garner some stares if I carried it with me around Europe. Leave the Stanleys at home, and opt for a collapsible water bottle that you can compress when not in use. This LifeStraw bottle is a game-changer because it has a built-in water filter for added protection against bacteria, parasites, and other miscellaneous objects that no one wants to find floating around inside their water. The screw-top helps prevent spills, and there’s a side loop that you can attach to a carabiner if you want to hook the bottle onto a bag or backpack.
Don’t: Pack a travel steamer
Instead: Bring a wrinkle-release spray
Amazon
Most travel steamers in the U.S. won’t work in Europe because of the different voltage standards. You could consider investing in a universal adapter and voltage converter, or you could leave the heavy steamer at home in favor of a fabric wrinkle-release spray like this two-pack from Downy. At 3 fluid ounces each, they’re much easier to pack, and all you have to do is spray onto your clothing and tug to see the wrinkles vanish while giving the fabric a fresh scent.
Don’t: Pack a curling iron
Instead: Bring heatless curlers
Amazon
Like travel steamers, if you plug in your hair dryer with mismatched voltage, it’s possible to ruin your device or even start a fire. Go the safer route with easy heatless curlers like this affordable set from Kitsch. Simply wrap your hair around the flexible rod, go to sleep, and wake up with a head full of curls without wasting time getting ready. The curling rod is made from satin to reduce frizz, and the set also includes two satin scrunchies.
Don’t: Pack an entire tube of disinfecting wipes
Instead: Bring a travel-size pack of wipes
Amazon
As a travel agent, I used to get questions about whether you can bring disinfecting wipes on a plane or if that qualifies as a liquid, since the large containers have a fair amount of liquid at the bottom. You can totally bring them—I fly with them all the time. However, instead of wasting space with a cylindrical tube, I’d recommend a more manageable two-pack that you can use to wipe down not only your airplane seat, but also rental cars, hotel rooms, or your suitcase.
When we first posted on Instagram that we were in New Zealand, two of the first messages we received were “How much should we spend?” and “What’s your itinerary?” And no surprise there, really. New Zealand may be one of the dreamiest and cinematic destinations on earth, but it’s not the most affordable or the easiest to get to.
So, in this article, we’ll walk you through our full New Zealand itinerary and give you a breakdown of all our actual expenses — from transportation and accommodations to food, activities, and the occasional “treat yourself” moment.
Go through the airport arrival process. First things first. Before our flight, we made sure to accomplish the New Zealand Traveller Declaration Form, and declared any of the risk items we were bringing in. We flew in from Melbourne with JetStar, and landed at Auckland International Airport at around 5:30 AM. And to be honest, we only had chocolates with us so we breezed through the Customs. The Immigration Officer at the counter was also the friendliest Immigration Officer I had encountered anywhere in the world. So that was a pretty delightful start of our New Zealand journey.
Travel to the city center. Upon emerging at the Arrival Hall, I withdrew some backup cash, although we didn’t get to use a lot of it because New Zealand is mostly cashless. Just outside the terminal, we looked for Bus Stop E, where we would catch the Sky Drive Airport Bus, which would take us straight to the city center. We struggled to find it at first, but know that when you get out of the terminal building, it should be to your left. According to Google Maps, the Sky Drive bus takes 25-45 minutes to reach downtown, depending on traffic conditions. But because it was pretty early, our bus made in just 20 minutes. The fare is NZD 20 (P678).
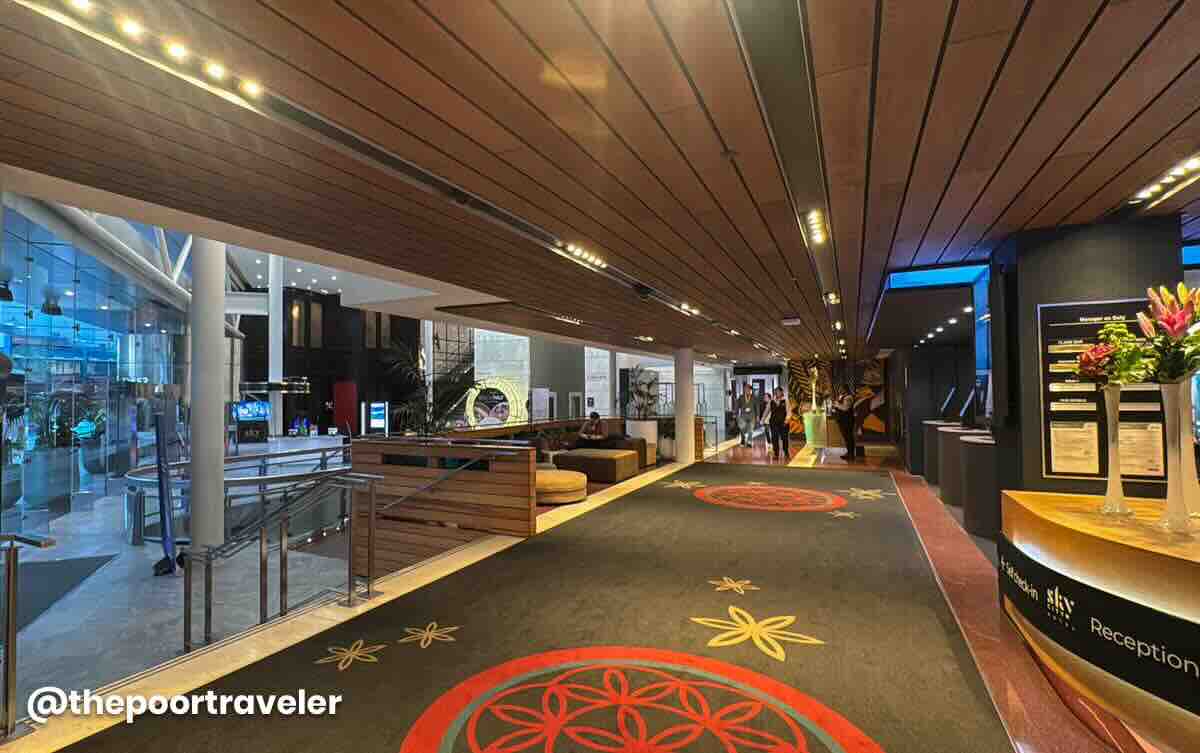
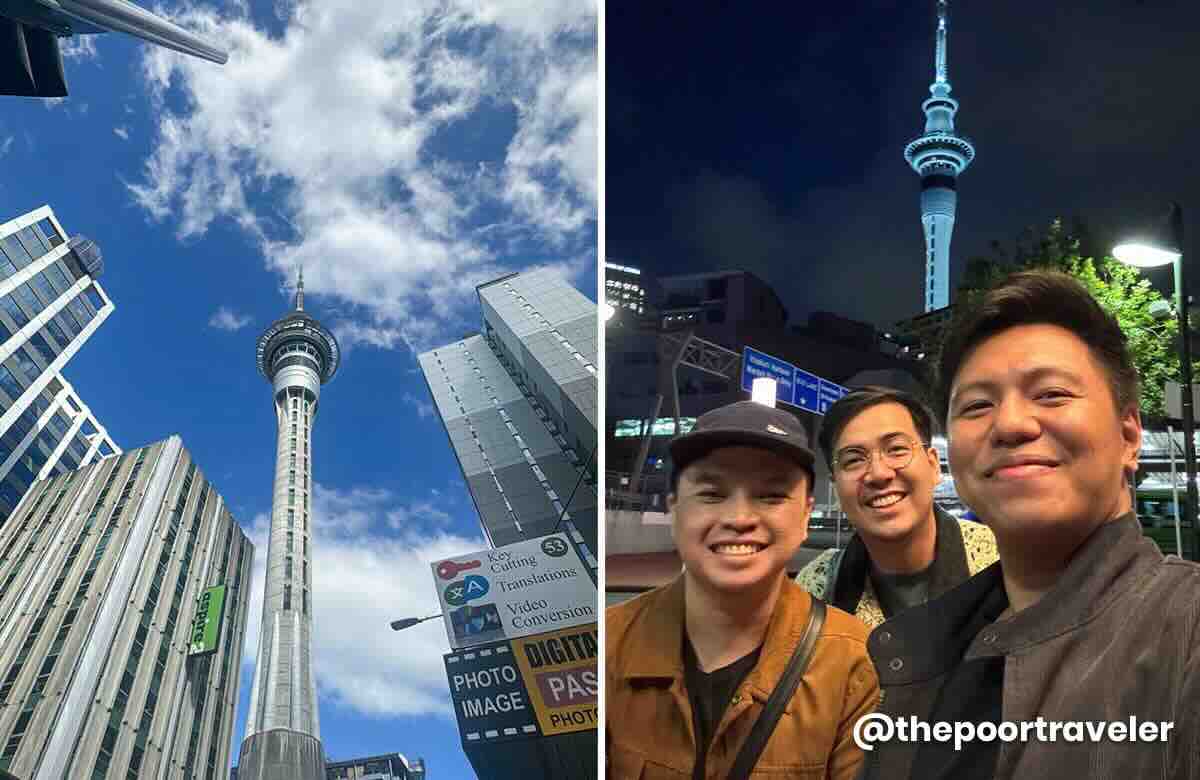
Check in at our hotel. The hotel we booked was SkyCity Hotel Auckland, just next to the iconic Sky Tower. When we reserved our room, the rate was NZD 170 (USD 102, PHP 5763) per night. Because we arrived hours ahead of the standard check-in time, our room was not ready yet, but they kept our bags while we spend the next hours exploring the city.
Auckland Foreshore Heritage Walking Trail
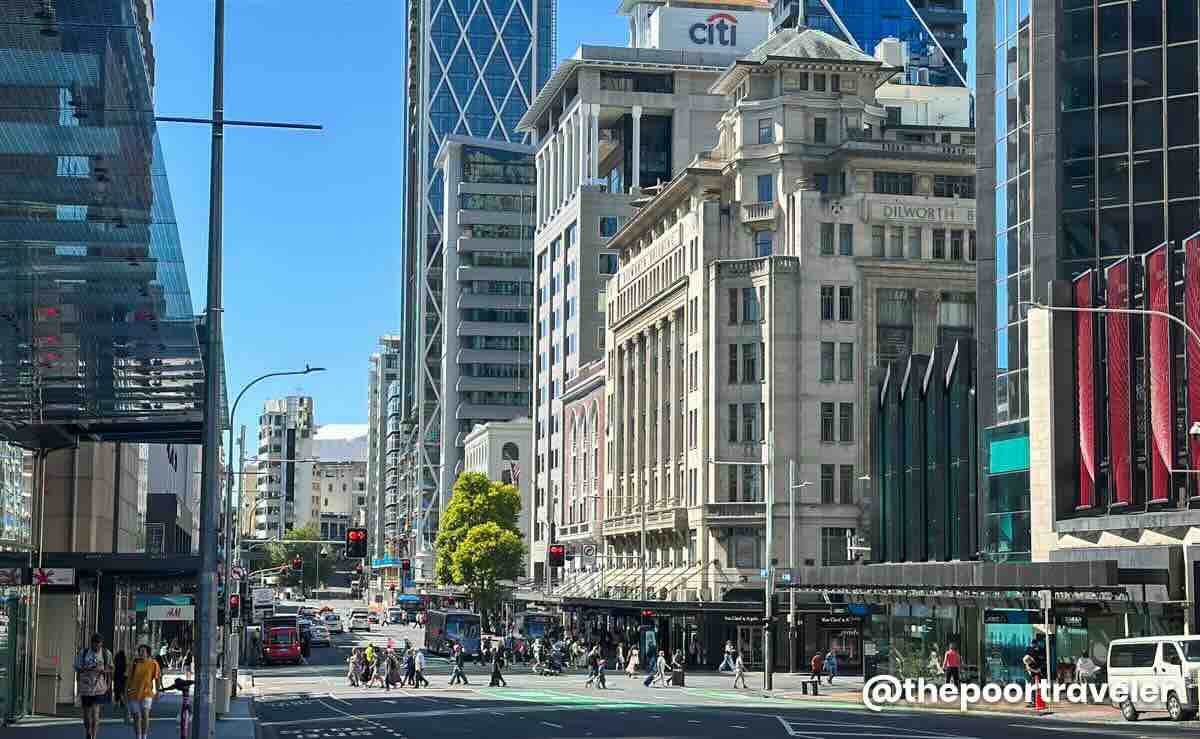
Auckland is New Zealand’s largest city, but it’s not as bustling or as overwhelming as other big cities in other countries. It still retains a pretty laidback atmosphere. For now, we decided to go sightseeing by following a section of Auckland’s foreshore heritage walking trail.
The city’s shoreline has changed a lot after a series of reclamations starting in the 19th century. Today’s seaboard is almost unrecognizable, but you can still trace the original coastline by following this walking trail, punctuated with 25 points of interest from Point Erin in the west all the way to Parnell Baths in the east. Some of these stops include heritage buildings and streets. Don’t worry — these sites are marked with information plaques so you can better appreciate their history and significance. The whole trail takes at least three hours.
Settle In and Recharge
We had a quick lunch before heading back to the hotel to check in. Our room was spacious and clean. We didn’t have a good view, but it was equipped with the usual full-service hotels staples — TV, mini-fridge, heater, air conditioning, working desk, toiletries, and whatnot.
Because we barely had any sleep, we decided to take a nap. Context: We flew in from Melbourne, where we had our week-long wedding trip and toured our families and friends. So yes, this is sort of a honeymoon trip, but with a couple of friends. We’ll have a more proper honeymoon later this year.
With all the wedding preparations and organizing the tours, we were exhausted at this point. So we really need to get some sleep.
If you book with AGODA, use our promo code AGODATPT for 10% discount.
If you prefer Klook, please use our promo code THEPOORTRAVELERKLOOK for up to P300 OFF or TPTKLOOK5 for up to P500 OFF. These codes might change in the future, so best to just visit thepoortraveler.net/klook to redeem updated discount codes!
Don’t worry, you don’t need to memorize all these codes and links. We compiled all the NEW ZEALAND TRAVEL ESSENTIALS including a list of all the hotels and hostels we tried in the TPT Masterlist. Just visit and scroll until you see the section about New Zealand. We also have a compilation for other destinations around the world.
Reconnect and Chill
At around 4PM, we got up and prepared to go out. Our original plan was to climb to the observation deck of the Sky Tower, but our Auckland-based friend Jerwin invited us to a rooftop cocktail bar, and of course, we chose shots over sights.
But if you intend to go to the Sky Tower, the entrance fee is NZD 45 if you buy online or NZD 47 for walk-in guests. If you prefer to reserve your ticket via Klook, we found this one.
Sky Tower Auckland Address: Victoria Street West, Auckland Central, Auckland 1010, New Zealand Online Ticket: NZD 45 (P1526) On-site Ticket: NZD 47 (P1594)
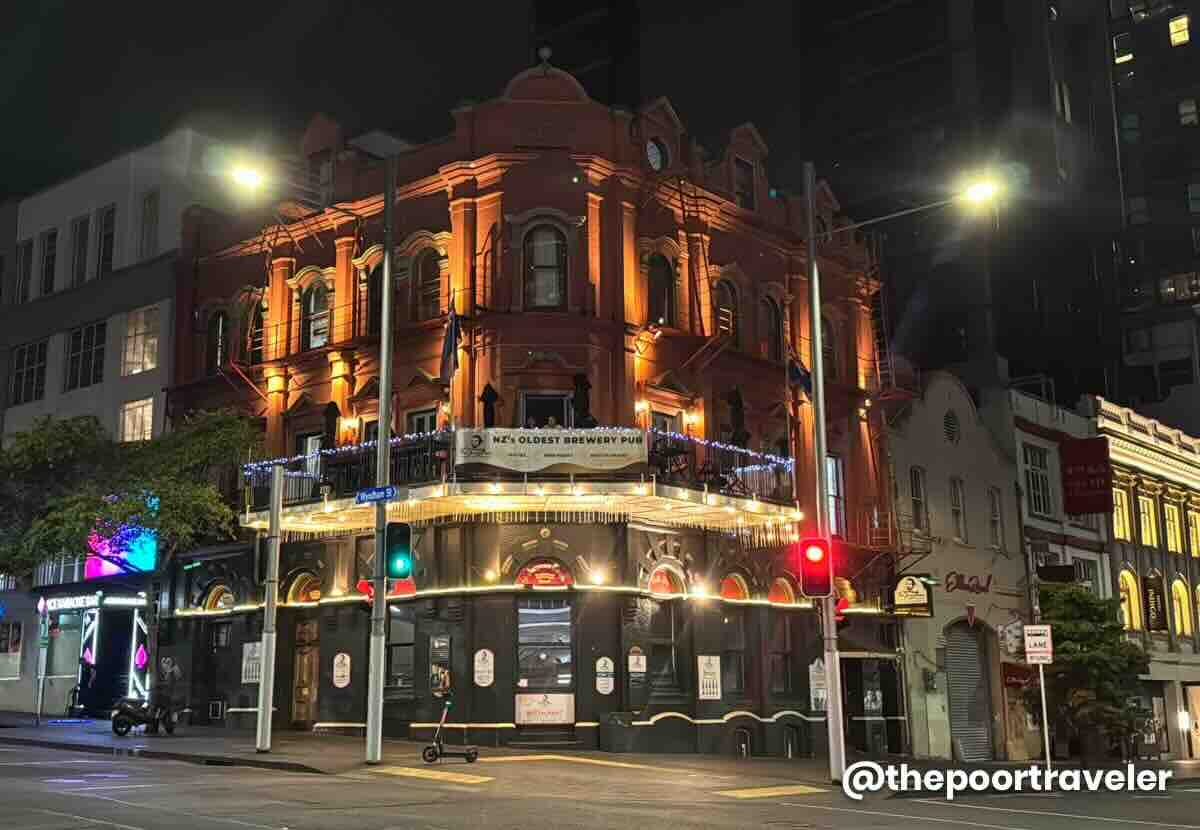
After hours of catching up with Jerwin, it was time to meet up with our other friends who will be joining us on this trip across New Zealand: Jax, Ivan, and Krisa. We ended the night with a round of beer at the iconic Shakespeare Hotel, which houses Auckland’s oldest microbrewery pub.
Vins downed a glass of the crisp and clean pilsner nicknamed the Jester, while I, as always, opted with something darker — the Gravedigger, which is a porter beer made from dark malt and had delicious bitter notes of coffee. We then called it a night and headed back to the hotel.
Shakespeare Brewery Address: Shakespeare Hotel, 61 Albert Street, Auckland Central, Auckland 1010, New Zealand Shakespeare Beer on Tap: Per Glass, NZD 14.58 (PHP 495)
DAY 2: HOBBITON & REDWOODS
Auckland to Matamata iSite
We started our second day early. Like, really early. That’s because the Hobbiton Movie Set Tour schedule that we got was at 11AM. It was the only slot available when we booked. Hobbiton is two hours from Auckland, and we had yet to secure a car rental, so we were up as early as 6AM just to be on the safe side.
The car we rented was good for five passengers, including the driver and four suitcases, which was perfect because Jax did not bring luggage as he would go back to Auckland after our Hobbiton tour, while the rest of us would head straight to Rotorua.
Europcar Rental Per Day: NZD 318.87 (PHP 10,816) Maximum Capacity: Good for 5 pax
Hobbiton Movie Set Tour
The tour that we booked would be picking up guests at the Matamata iSite. iSite is the term used for official tourist information centers here in New Zealand. Because we arrived early, we decided to grab breakfast from the many food spots along the main road. Jax and Vins shared a pie, while I had meat on skewers.
After a quick photo op with the Hobbiton signage, we boarded the bus to the movie set. On the way there, the TV screen inside the bus showed mini-documentaries about the site. By 11:45 AM, we were at the entrance to the set.
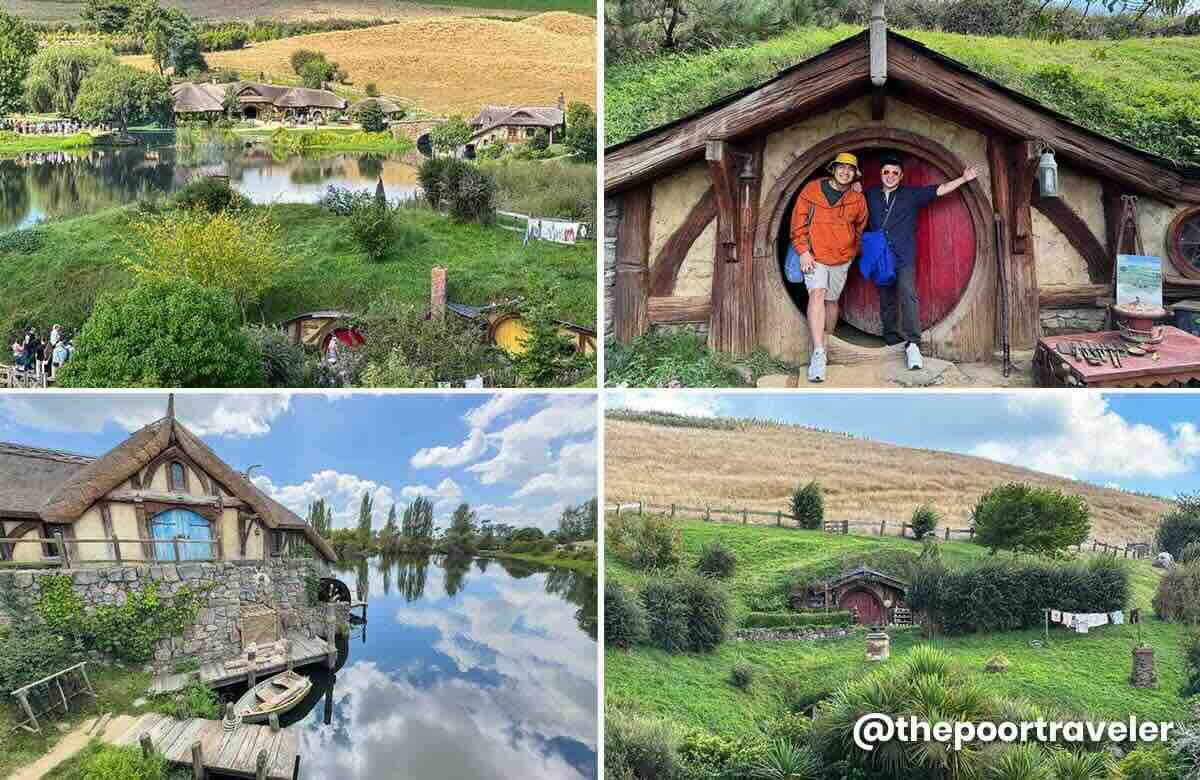
The only way to explore the site is by joining a guided tour, and you must stick to your group all the time. Along the way, the guide would be sharing interesting facts about how the site was chosen and built, and how the films were made. Vins and I had seen both the Lord of the Rings and The Hobbit trilogies multiple times, so we were beyond thrilled to walk on the same ground as Bilbo, Frodo, and Sam.
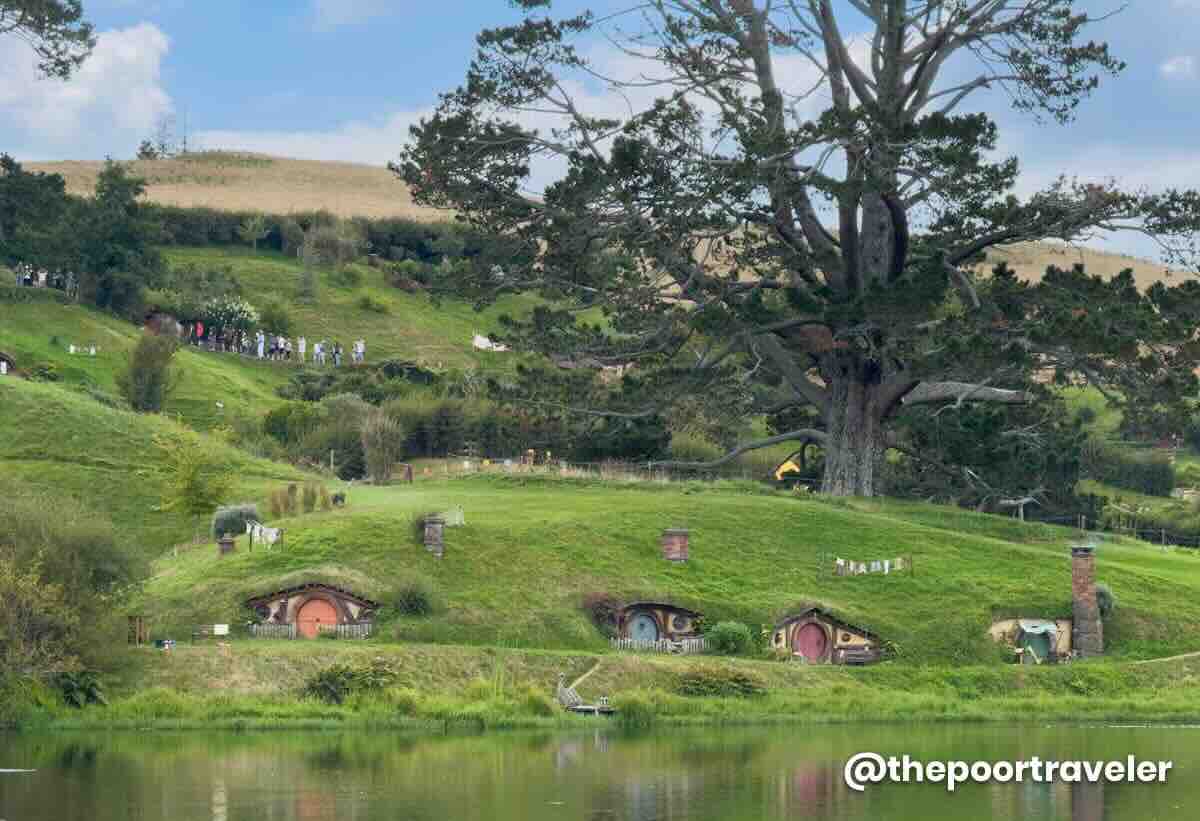
The site was used for exterior shots only. At the time of filming, all interior scenes were shot in a studio elsewhere. Today, however, there are two hobbit houses that visitors can enter and explore. Think of it as a mini-museum. But these were not used in the movies.
One of the most fascinating bit was that the incredibly cinematic giant oak tree above was completely fake. The trunk and branches were made of fiberglass while the leaves silk. There was also a snack stop in the middle of the tour, where we enjoyed a complimentary drink. This can be a stout, amber ale, apple cider or ginger beer.
After the tour, the bus took us to the Shire’s Rest Café, which was the more usual jump-off point to Hobbiton. They also had a souvenir shop on site.
We then boarded another bus back to Matamata iSite. The tour itself lasted two hours. Including the bus transfers from Matamata iSite and the stop at Shire’s Rest, allow around four hours in your itinerary. At least six hours, if including transfers to and from Auckland or Rotorua.
If you want to secure your slot ahead of time, you can check out packages from Klook! You can choose if you want ticket only or with transfers from Auckland or Rotorua. You can also add a Waitomo Glow Worm Caves stop.
Address: 501 Buckland Road, Hinuera, Matamata 3472, New Zealand Tour Rate: NZD 120 (PHP 4070)
Rotorua Hostel Check-In
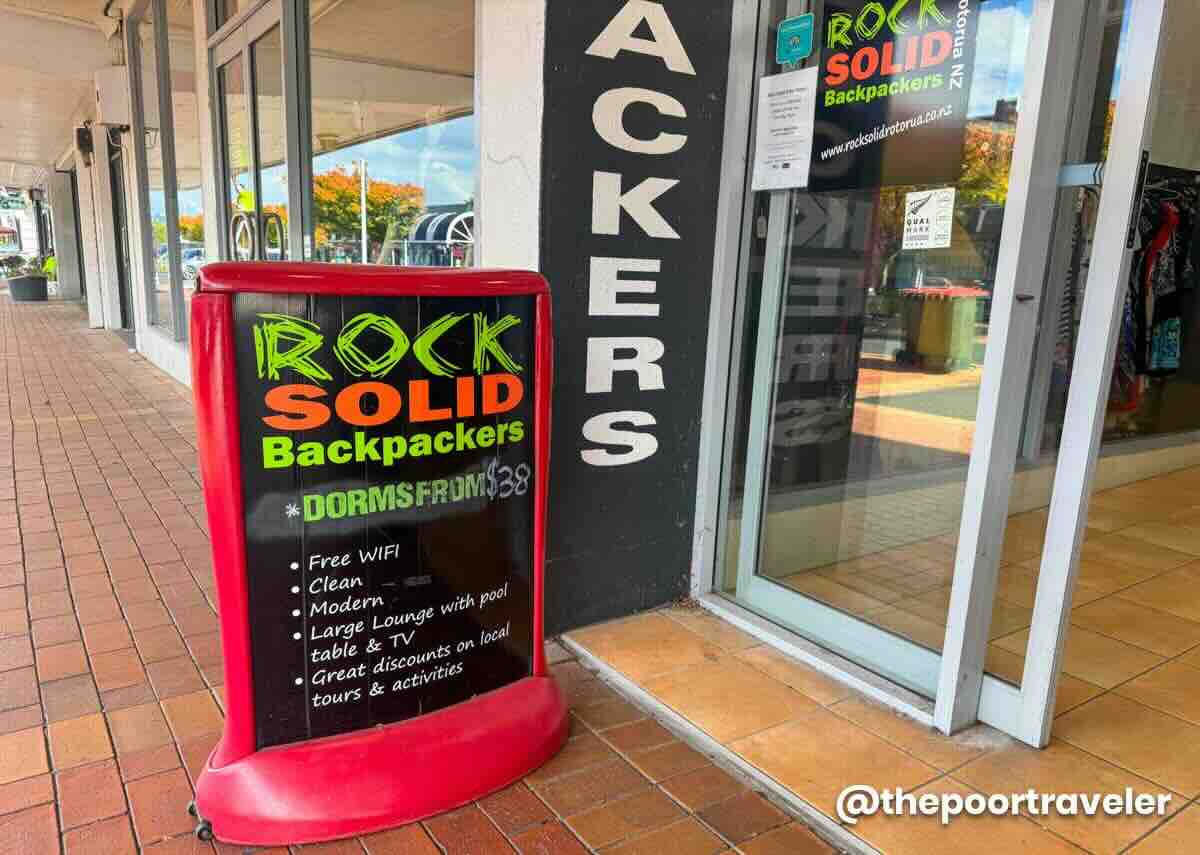
After parting ways with Jax, we then drove to our hostel in Rotorua called Rock Solid Backpackers. It was a no-frills hostel, but we had in the room a table, mini-fridge, and an ensuite toilet and bath. It was a fan room, which wasn’t a problem since New Zealand’s climate is generally relatively mild, even in the summer.
We paid PHP 5466 per night, and we’re staying for two nights. Yes, for a fan room. That’s how expensive rooms are here. For the updated prices, you can Check Rates & Availability Here! ✅
Redwoods Treewalk
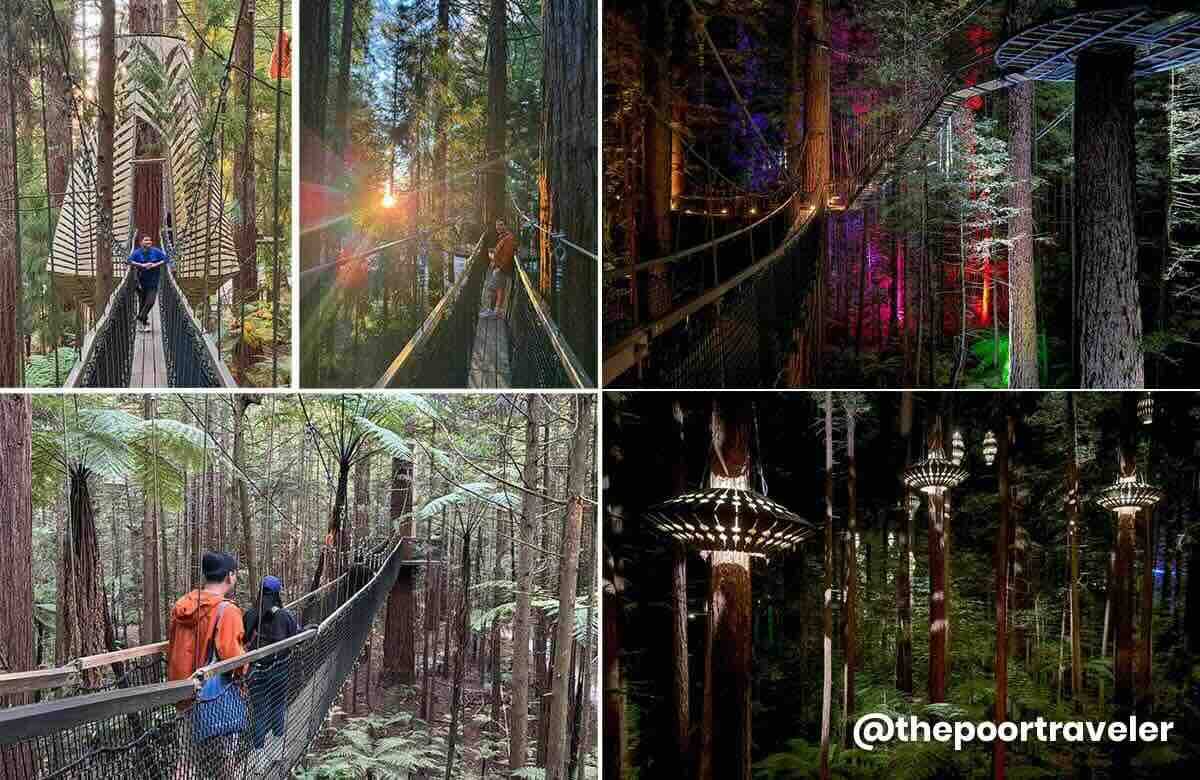
After dropping our bags and freshening up a bit, it was time to head to the Whakarewarewa Forest for an elevated hike, literally. This is the Redwoods Treewalk, a collection of 28 suspension bridges spanning 700 meters, making it the longest living tree walk in the world. You must follow the path and you only get one round. You can enjoy it in the daytime or at night, each requiring a separate ticket at NZD 40, unless you avail of the combo ticket which costs NZD 60, giving you a 20-dollar discount.
We purchased the combo ticket. Under the daylight and just before sunset, it had this enchanting atmosphere. It was like communing with nature with a bit of excitement. But at night, when the illuminations were on, it gave off a more otherworldly feel.
And oh, don’t miss the ice cream sold on site for NZD 12.15. It was soooo good!
You can book your Redwoods Treewalk experience in advance on Klook! This package includes Altitude, Treewalk Day Tour, and Treewalk Night Tour with Fast Pass entry.
Address: 1 Long Mile Road, Tītokorangi Drive access off Tarawera Road, Whakarewarewa, Rotorua 3010, New Zealand Entrance Fee: Day or Night Ticket, NZD 40 (PHP 1357); Combo Ticket, NZD 60 (PHP 2035) Redwoods Ice Cream: NZD 12.15 (PHP 412)
DAY 3: ROTORUA TOUR
Eat Streat
For the third day, our original plan was to be amazed by the Waitomo Glowworm Caves. But the night before, we agreed to ditch this plan because Krisa, our designated captain of the car, was not comfortable driving for two and a half hours to the caves. We also took this opportunity to finally get some decent sleep. Although this was only our third day in New Zealand, if you count our stay in Australia, this was already our Day 10 and prior to this, we had never gotten any sleep longer than four hours. And we really took advantage of it.
The gang met up for lunch at Eat Streat, a collection of the city’s most popular restaurants. Vins and I shared cuts of lamb chops (NZD 34) and BBQ bourbon pork ribs (NZD 32). New Zealand is famous for its big population of sheep, so lamb was a no-brainer for us. We also ordered pork, just in case the lamb was too gamey for our own taste.
Address: Tutanekai Street, Rotorua 3010, New Zealand
Wai-o-Tapu Geothermal Wonderland
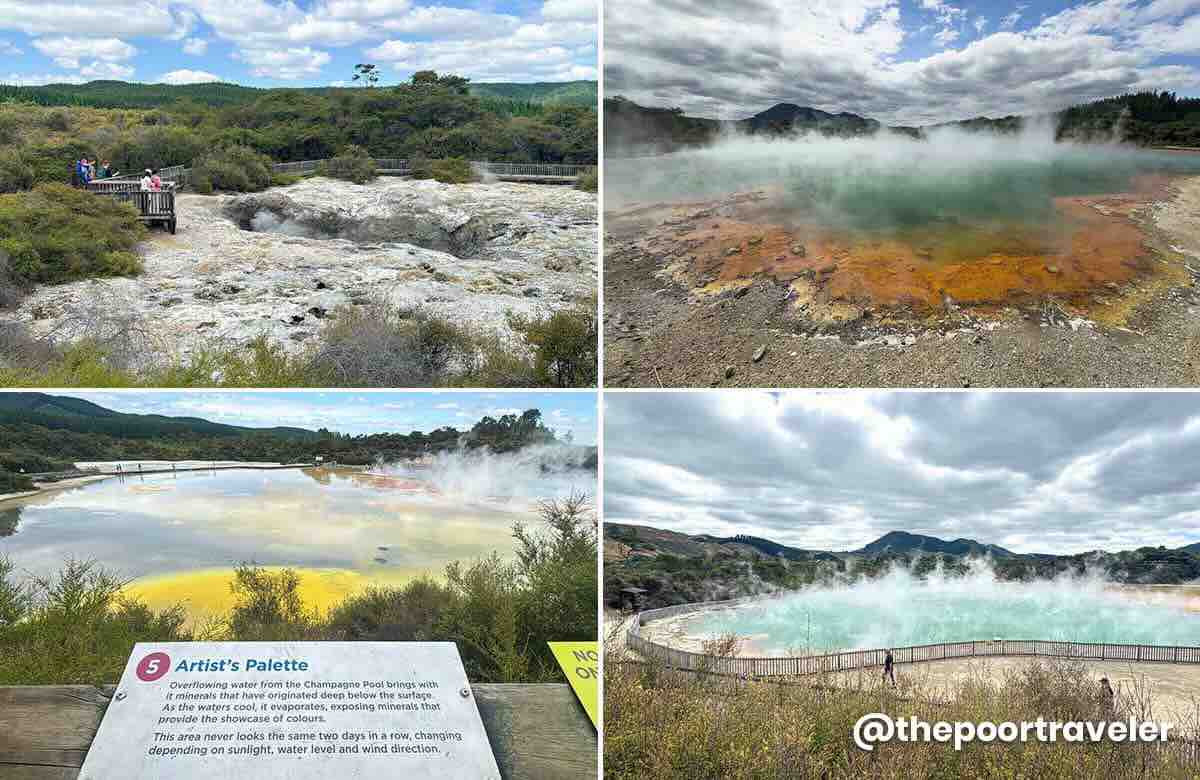
Then, we drove to Wai-o-Tapu Geothermal Wonderland, one of New Zealand’s most colorful and surreal natural attractions. Wai-O-Tapu, which means “Sacred Waters” in Māori, is a volcanic park famous for its bubbling mud pools, steaming craters, and the iconic Champagne Pool. Next to it is the Artist’s Palette, a rainbow-colored terrace that looks like someone spilled watercolors everywhere.
It’s not just pretty, though — it smells like sulfur (think rotten eggs), so come prepared with a strong nose or a sense of humor.
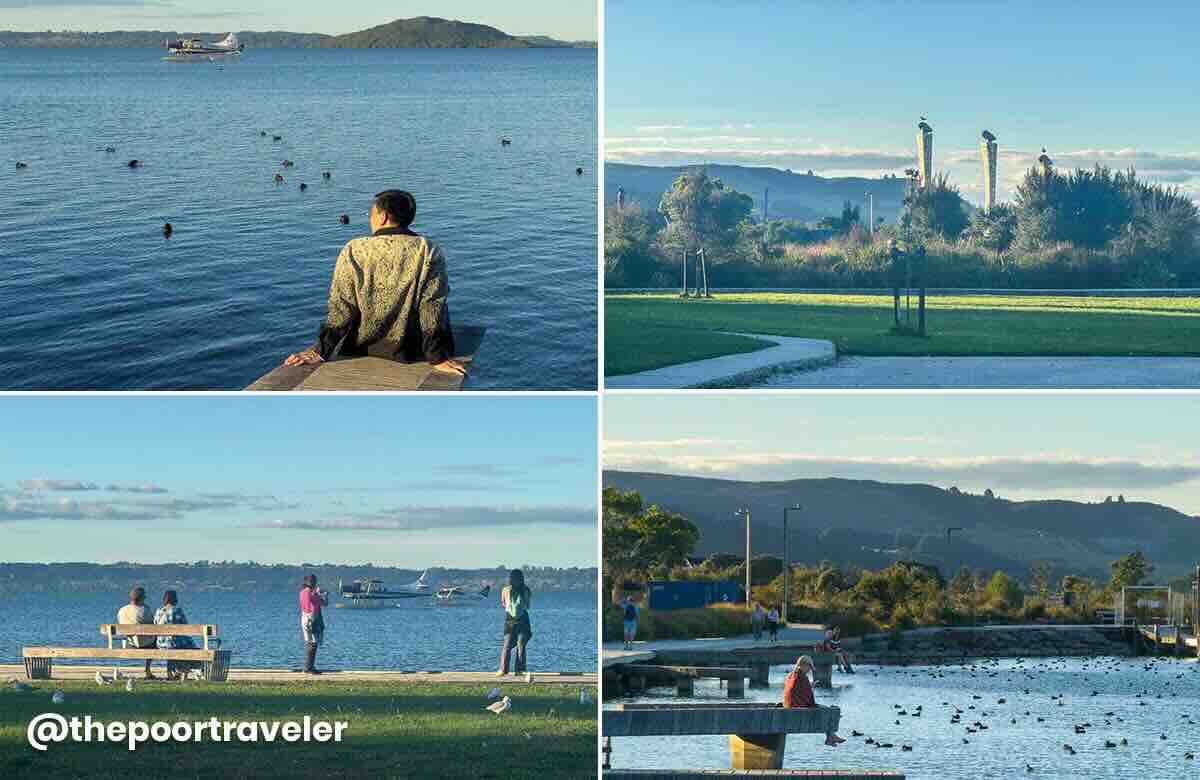
After taking care of something at the Rotorua Airport, we then drove to Rotorua Lakefront Boardwalk on the coast of Lake Rotorua. We spent over an hour here, just relaxing and absorbing the surroundings, before returning to Eat Streat for dinner.
Address: Lakefront Drive, Ohinemutu, Rotorua 3010, New Zealand
Dinnertime
We chose to dine at Atticus Finch this time around. But the real highlight here was the ice cream at Lady Janes. Each of us had double scoop, worth NZD 10.80. The fig and manuka honey flavor was incredible!
Lady Janes Address: 1092 Eat Streat, Tutanekai Street, Rotorua 3010, New Zealand Price: Double Scoop, NZD 10.80 (PHP 366)
DAY 4: ROTORUA TO CHRISTCHURCH
Christchurch Airport to City Center
Although Rotorua has its own airport, flights to Christchurch from here are significantly pricier than from Auckland, so we headed back to the big city.
We stopped at a gas station, returned the rental car at Europcar international site, and then walked 1.2 km to the domestic terminal. We grabbed lunch, and then flew to Christchurch.
We arrived in New Zealand’s Garden City at around 5:30 PM. Just outside the airport, we boarded the bus (Bus #8 or #29) to the city center which set us back NZD 4 (PHP 136) per person.
Christchurch Guesthouse Check-In
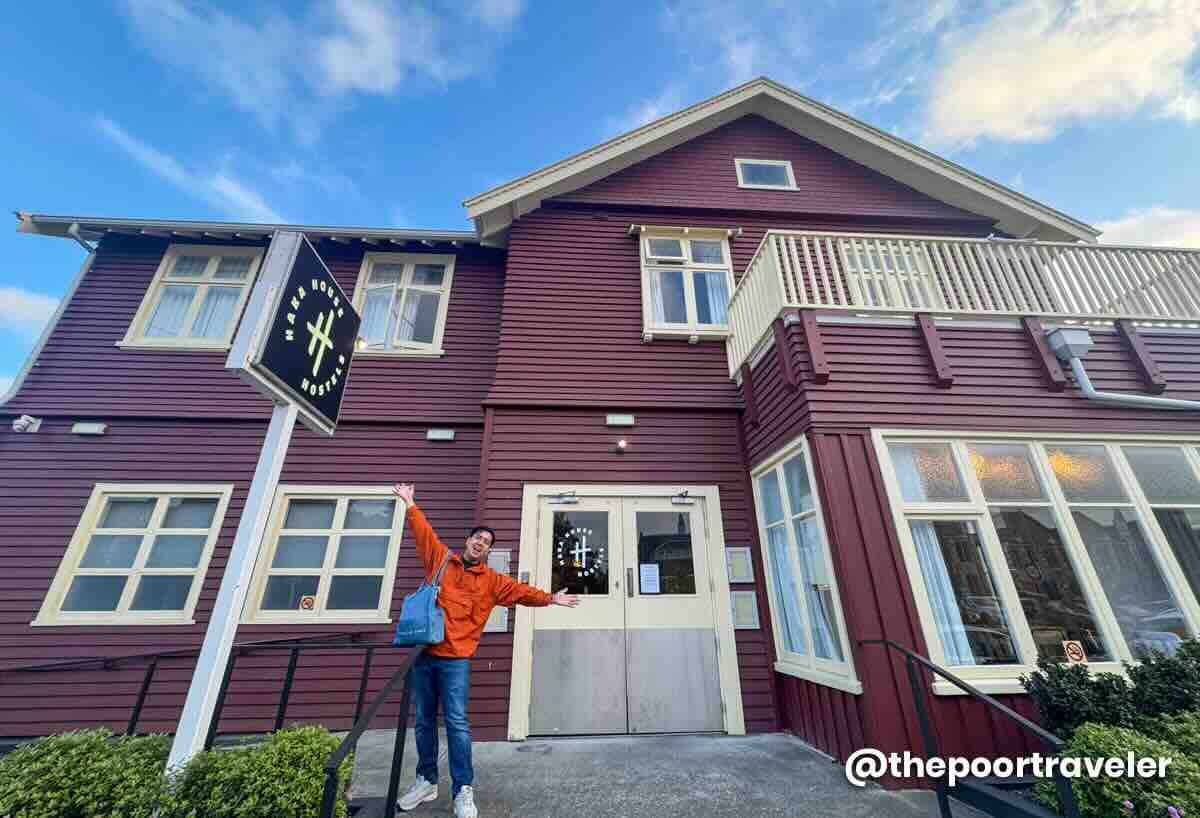
Here in Christchurch, we’d be spending two nights at Haka House, a 19th century building transformed into a guesthouse. It’s newly renovated so it felt more like a boutique hotel than a hostel. We shelled out PHP 5895 per night for a private room with ensuite toilet and bath. They had no elevator though, so it can be challenging if you have heavy luggage.
If you want a hotel that is close to most points of interest including the Botanical Garden and Riverside Market, this is a viable option. You can Check Rates & Availability Here! ✅
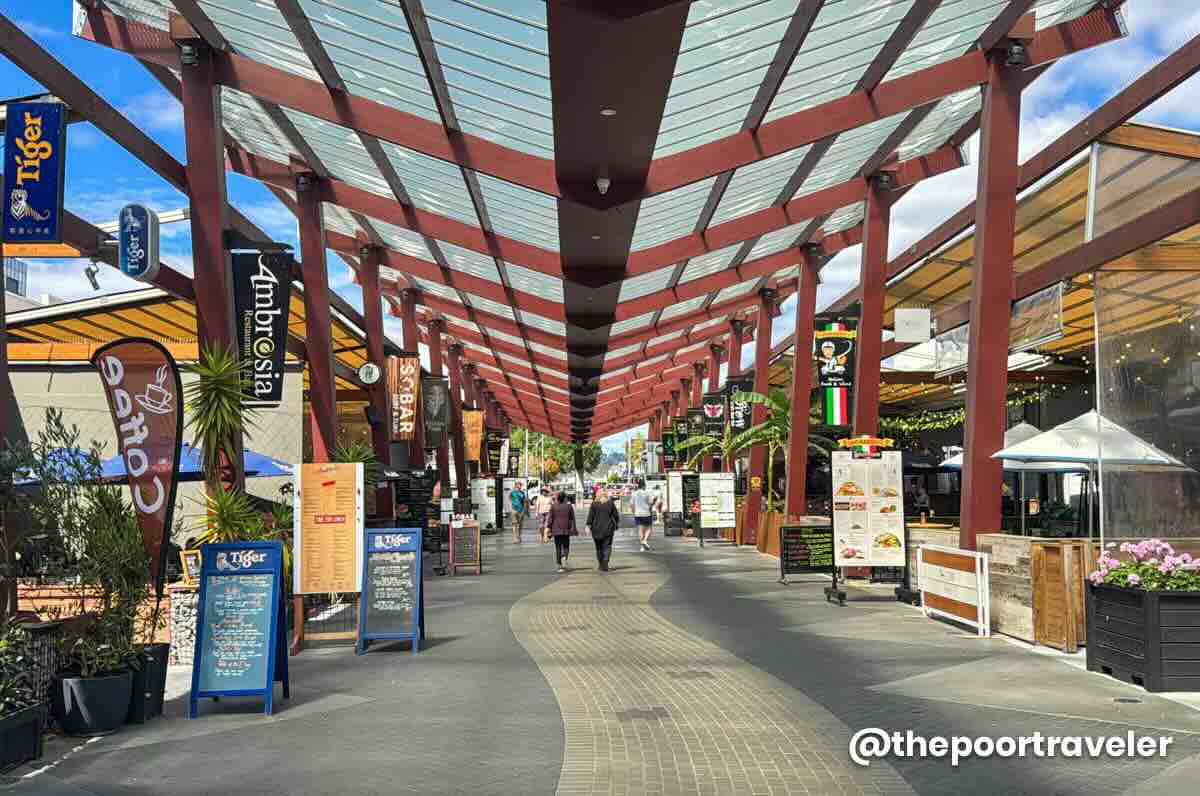
Riverside Market
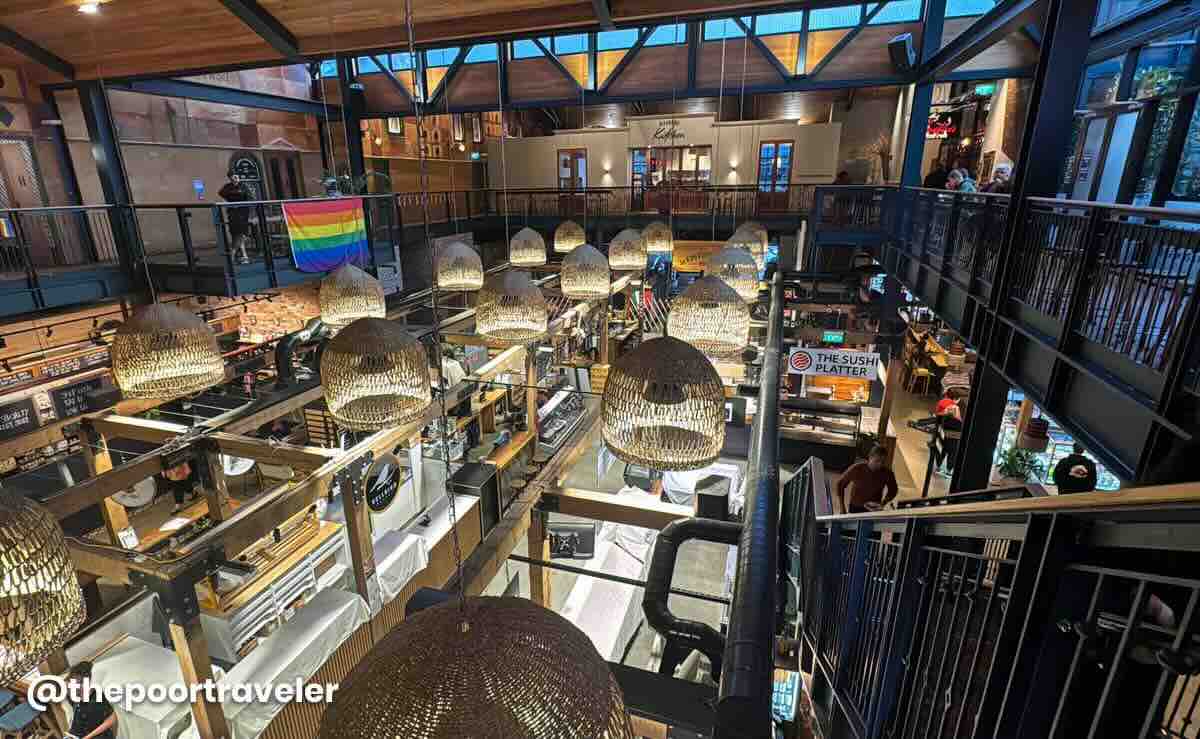
We basically just dropped off our bags and immediately went out for dinner at Riverside Market, which is a fantastic, diverse food hall. Category is international cuisine. Vins had Thai, while I had Malaysian.
We also had Ben and Jerry Ice Cream here to remind ourselves of the taste of non-New Zealand ice cream, but feel free to skip it since you can find it everywhere.
At this point we had only been in Christchurch for a few hours but we were already liking the vibe. Even at night, we could tell that it was full of charm and character.
Address: 96 Oxford Terrace, Christchurch Central City, Christchurch 8011, New Zealand
DAY 5: CHRISTCHURCH TOUR
Christchurch Walking Tour
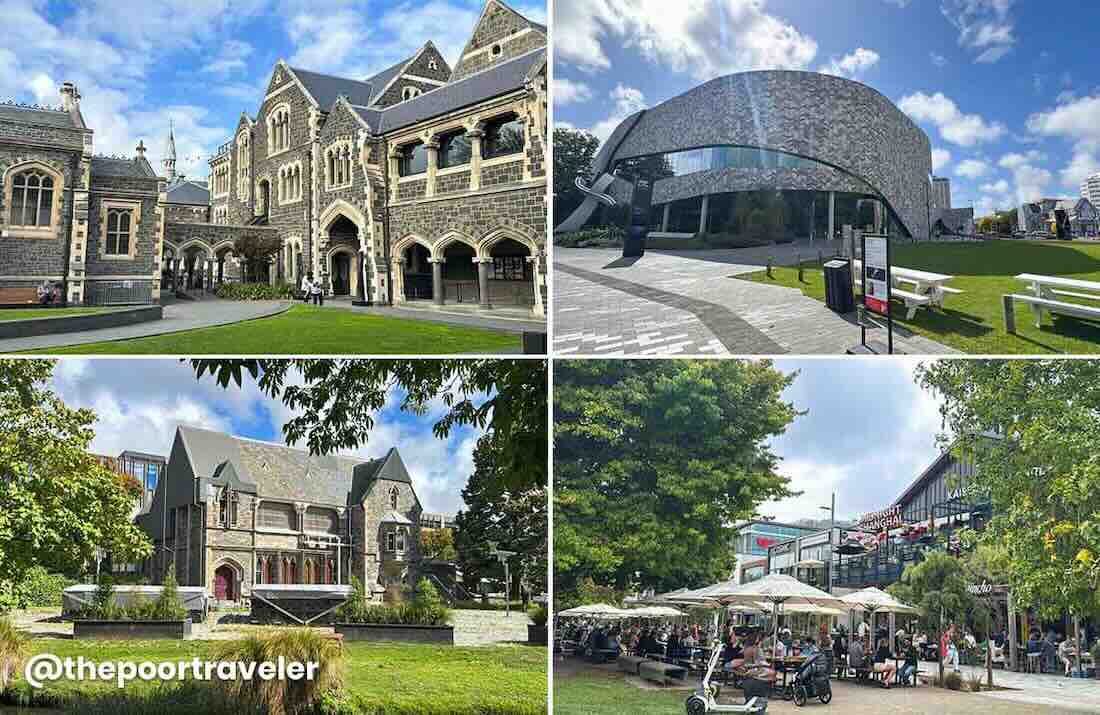
Our fifth day was all about Christchurch. At 10AM, we were already at the Christchurch Arts Centre, the starting point of the city walking tour. Our guide was Craig, a local and a prolific traveler himself, and for the next three hours, he showed us around his hometown.
Yes, three hours of walking, hopping from one notable site to another, appreciating heritage buildings, and getting inspired by how the city built itself up after the catastrophic 2011 earthquake.
Needless to say, we were exhausted by the end of it. Good thing, the tour ended at the Canterbury Earthquake National Memorial, which was just a block away from the Riverside Market, where we had lunch. This time, Vins went Mexican and I chose this Indian lunch platter from Dosa Kitchen with two types of curries, rice and naan bread for only NZD 18 (P612).
Christchurch Walking Tour Fee: NZD 25 (PHP 848) per person
Christchurch Gondola
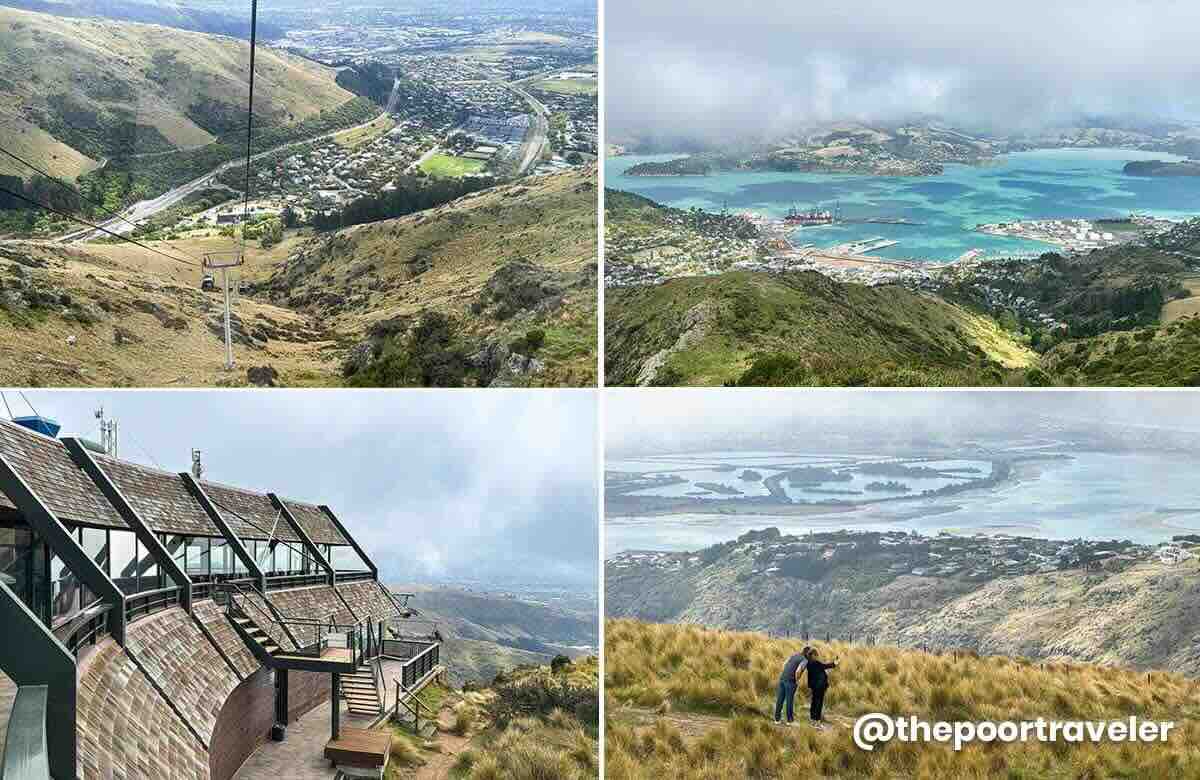
After the walking tour, we really wanted to just chill and take a break from all that galloping, so we set our sights on the Christchurch Gondola. You can take the bus for NZD 4 (or NZD 2 if you have their local card), but since we were a group of four, hailing an Uber wasn’t that bad, which cost us NZD 26 or NZD 6.5 per person.
The Christchurch Gondola’s admission ticket is NZD 42 per person. We hopped into a cable car and enjoyed the 10-minute, 1000-meter journey to the top of Mount Cavendish. At 445 meters above sea level, the top station offers breathtaking panoramic views of the city, the Canterbury Plains, the Southern Alps and even the Pacific Ocean.
The building is also home to Red Rock Café. We all decided to get coffee to keep our spirits up. I got myself a flat white for NZD 6.5. And since we had not had dessert yet, Vins and I shared a cookie for NZD 6.
After a couple of hours, we rode the cable car down to the base and boarded Bus #8 back to the city center.
Address: 10 Bridle Path Road, Heathcote Valley, Christchurch 8022, New Zealand Opening Hours: Daily, 10:00 AM – 4:00 PM Entrance Fee: NZD 42 (PHP 1427)
Botanic Gardens
This time, we were to explore the Botanic Gardens. You can join a guided tour onboard a caterpillar shuttle. But we decided to explore it on foot and on our own instead.
Address: Rolleston Avenue, Christchurch Central City, Christchurch 8013, New Zealand Opening Hours: Daily, 7:00 AM – 6:30 PM
New Regent Street
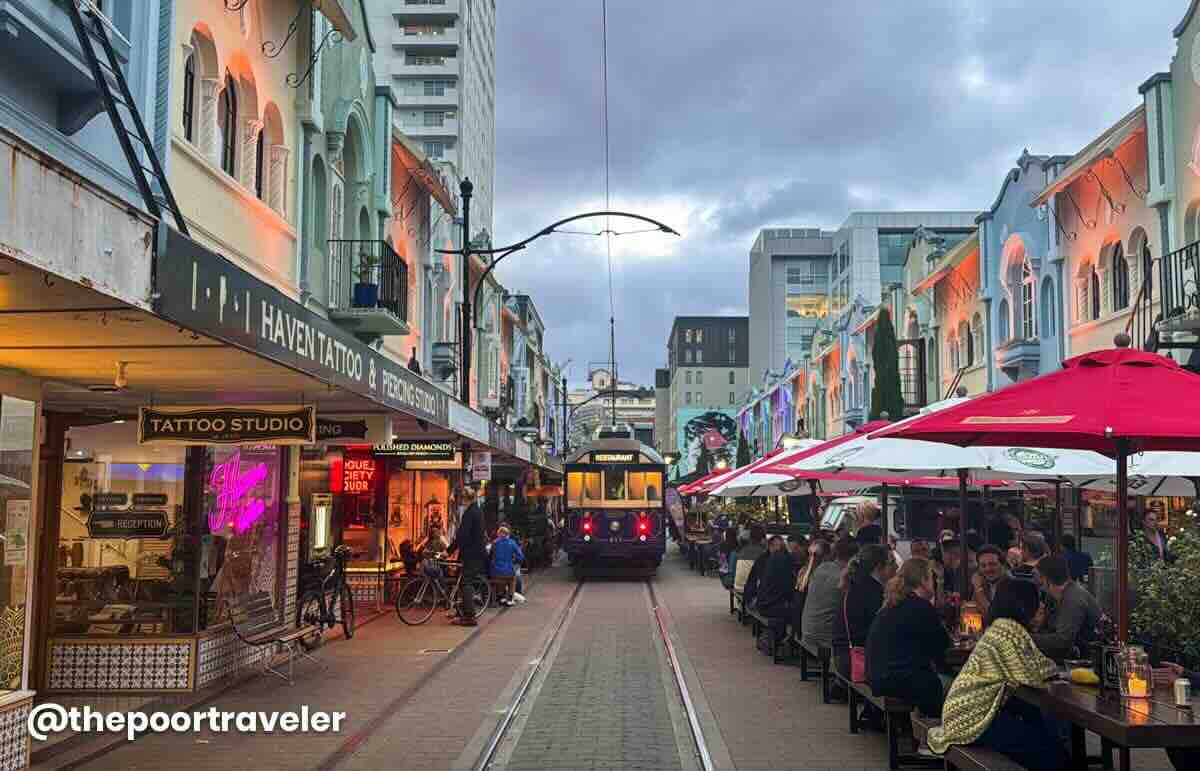
For dinner, we opted to return to New Regent Street. We passed through the area during the walking tour and we wanted to burn more time here. We also had another dose of ice cream, this time from Rollickin’, a local favorite. I had a scoop of Biscoff the Charts and Hokey Tokey Pokey.
Rollickin’ Address: 35 New Regent Street, Christchurch Central City, Christchurch 8011, New Zealand Gelato Price: Single Scoop, NZD 7.20 (PHP 244); Double Scoop, NZD 10.50 (PHP 356)
DAY 6: LAKE TEKAPO & MOUNT COOK
Christchurch-Queenstown One-Way Tour
It’s time to head to Queenstown. But instead of flying or taking a direct bus, we opted to join a one-way tour instead.
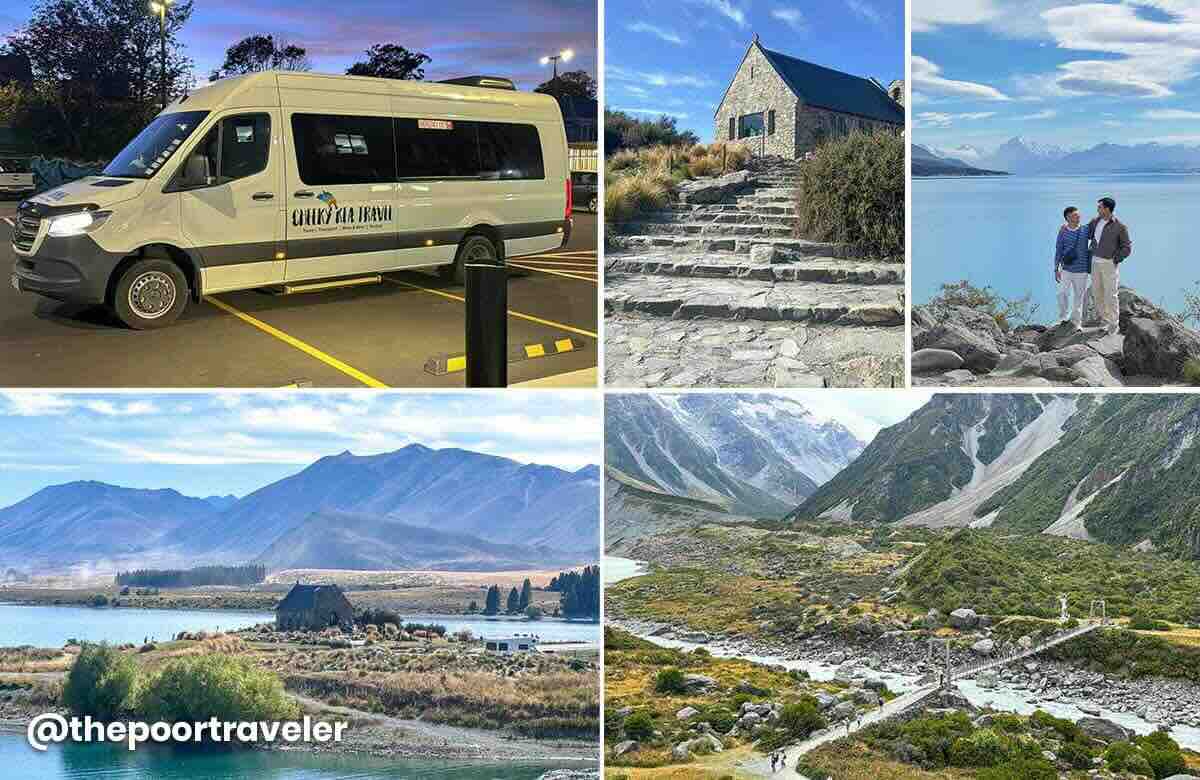
When you book a one-way tour, the shuttle will pick you up in one city and the tour will end in another, making stops along the way. In our case, we were picked up in Christchurch at 6:30 AM, toured the Lake Tekapo and Mount Cook areas, and then dropped us off in Queenstown. It’s like tour and transfer in one. The vehicle also had a trailer for luggage. Packed lunch is also included. The journey usually takes 13-14 hours.
We stopped at Geraldine for coffee and breakfast, admired the quaint Church of the Good Shepherd standing next to Lake Tekapo, sampled salmon dishes at High Country Salmon and fruit ice cream at Jackson Orchards, and marveled at stunning roadside views of Lindis Pass, took plenty of photos at Lake Pukaki, and hiked along the Hooker Valley Trail. We only got to reach the bridge because of the limited time, but we still had a blast.
In case you’re wondering, yes — this tour is available on Klook!
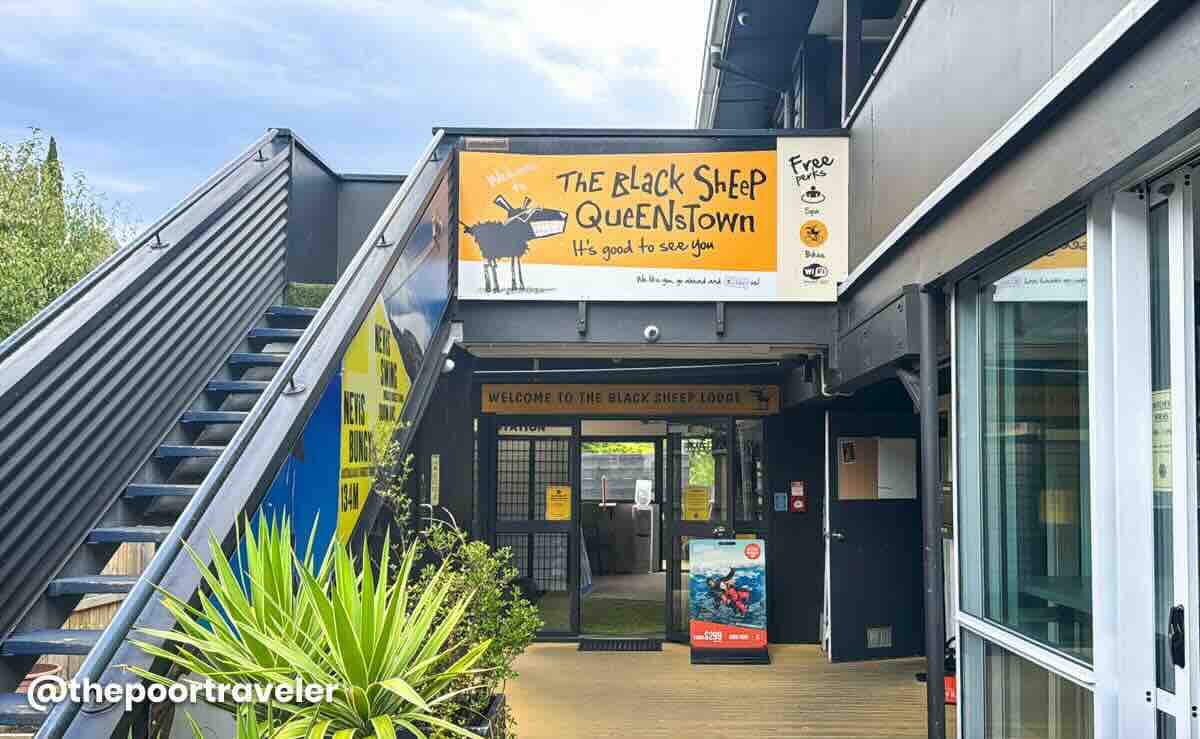
They dropped us off at our lodge, the Black Sheep Backpackers Hostel, where we would be spending the next four nights at around NZD 215 (USD 128, PHP 7293) per night. And that’s for a private fan room without its own toilet and bath. But this was the cheapest accommodation we found at the time. You can Check Rates & Availability Here! ✅
Fergburger
After checking in and dropping our bags in the room, we immediately went out for dinner. The most famous food spot here is probably Fergburger. We ordered its signature burger with beef patty and something more offbeat — a pork belly burger. And truth be told, to me, the signature burger was just alright, but the pork belly one was absolutely delicious. Servings were humongous, too.
I wouldn’t call myself a daredevil and I don’t really describe myself as adventurous. But we’re jumping off a plane on our seventh day. Yes, I went skydiving in New Zealand! There were three main reasons why I decided to finally do it here in Queenstown. First, my friend Krisa really wanted to do it and she needed a companion. Both Ivan and Vins won’t ever do it even if you put a gun to their heads.
Second, because it’s relatively affordable here. Emphasis on relatively. Skydiving is generally expensive. In Siquijor and in Cebu, you’ll be shelling out PHP 24,500 per person, including photos and videos. In Switzerland, the cheapest we found was CHF 450 (PHP 30,200). In Namibia, it’s NAD 4700 (PHP 14,200), excluding video documentation. In Cape Town, it’s ZAR 3950 (PHP 12,200) without video. In Australia, it’s AUD 389 (PHP 13,950) without video. In Dubai, it can set you back AED 2199 (PHP 33,300), including video.
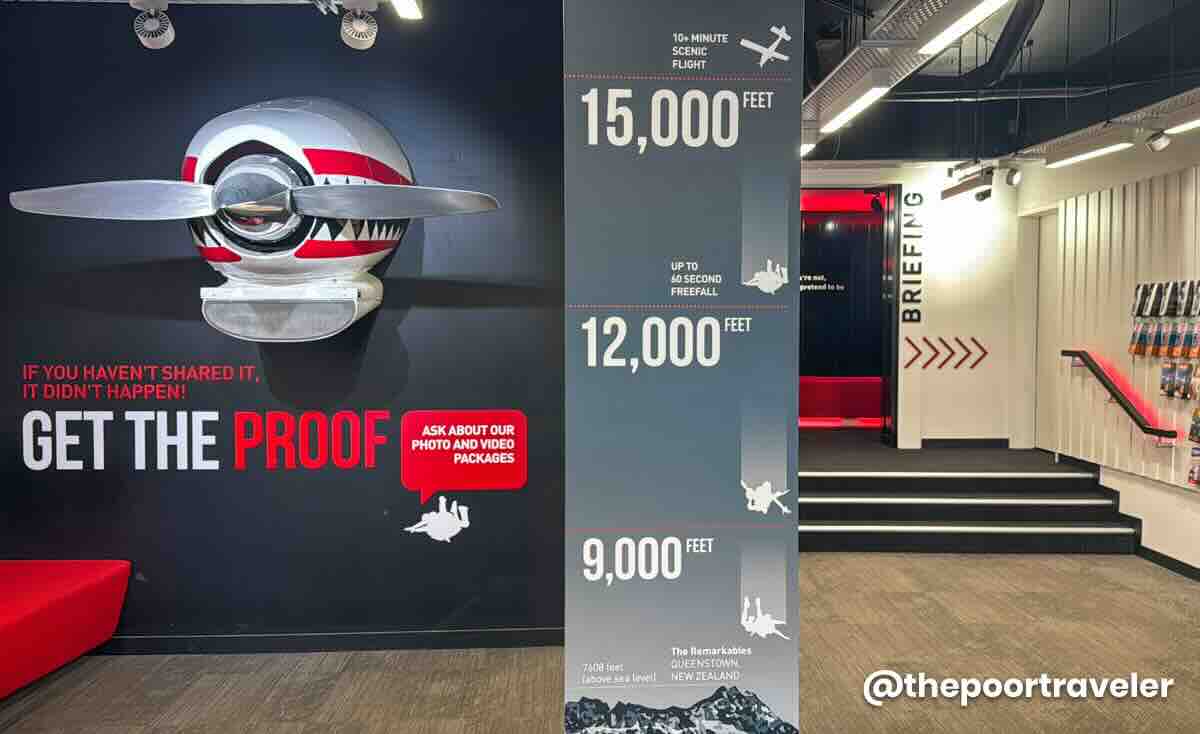
Here in Queenstown, the most budget-friendly option is 9000-ft, which costs NZD 345 (PHP 11,400). If you’re just after the experience, you can totally go for just that. If you want to capture the experience, their photo and video package costs NZD 209 (PHP 6890). So that’s a total of NZD 554 (PHP 18,290). Still cheaper than most options out there.
And the third reason, I thought it was quite fitting to go skydiving in a destination that many regard as the “Adventure Capital of the World”. It’s a nickname that the city has earned and deserved. First, this is where you’ll find the world’s first permanent commercial bungee jumping site — at Kawarau Gorge Suspension Bridge. And over the years, it became a venue for more and more extreme sports.
Anyway, the meetup place was at the NZONE office in the city center, just within walking distance of our hostel. At the last minute, Krisa and I decided to upgrade to 12,000 feet (NZD 430; PHP 14,200).
After a short briefing, we were then transferred to the drop zone, where I stepped into a jumpsuit and met Elliot, who would be diving with me. For the next several minutes, my life was in his hands.
It was glorious! I don’t think I’ll be doing it again in the near or distant future, but it was a hell lot of fun.
Patagonia Ice Creamery and Chocolaterie
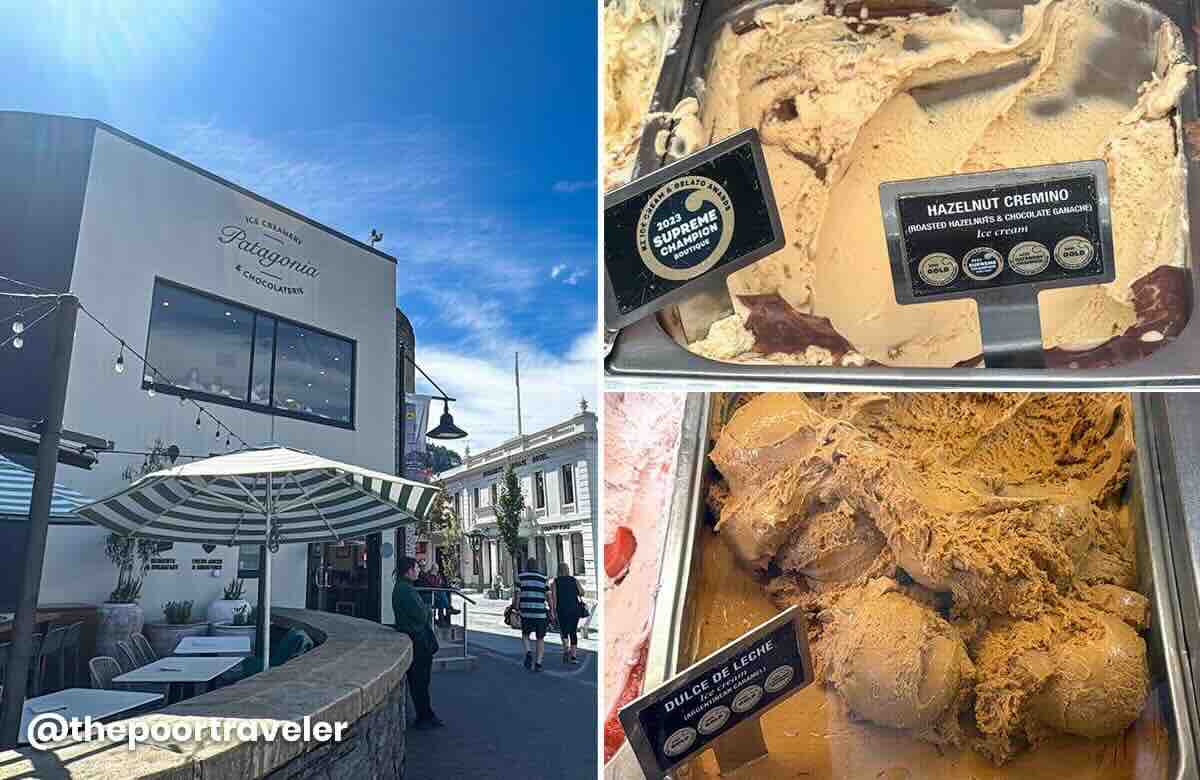
After lunch, we had dessert at the famous Patagonia Ice Creamery and Chocolaterie, where I had its signature and award-winning hazelnut cremino, but the flavor that really won me over was its dulce de leche.
Address: 2 Rees Street, Corner of the Mall, Queenstown 9300, New Zealand Prices: Single Scoop, NZD 7.50 (P254); Double Scoop, NZD 11 (P372)
Skyline Queenstown
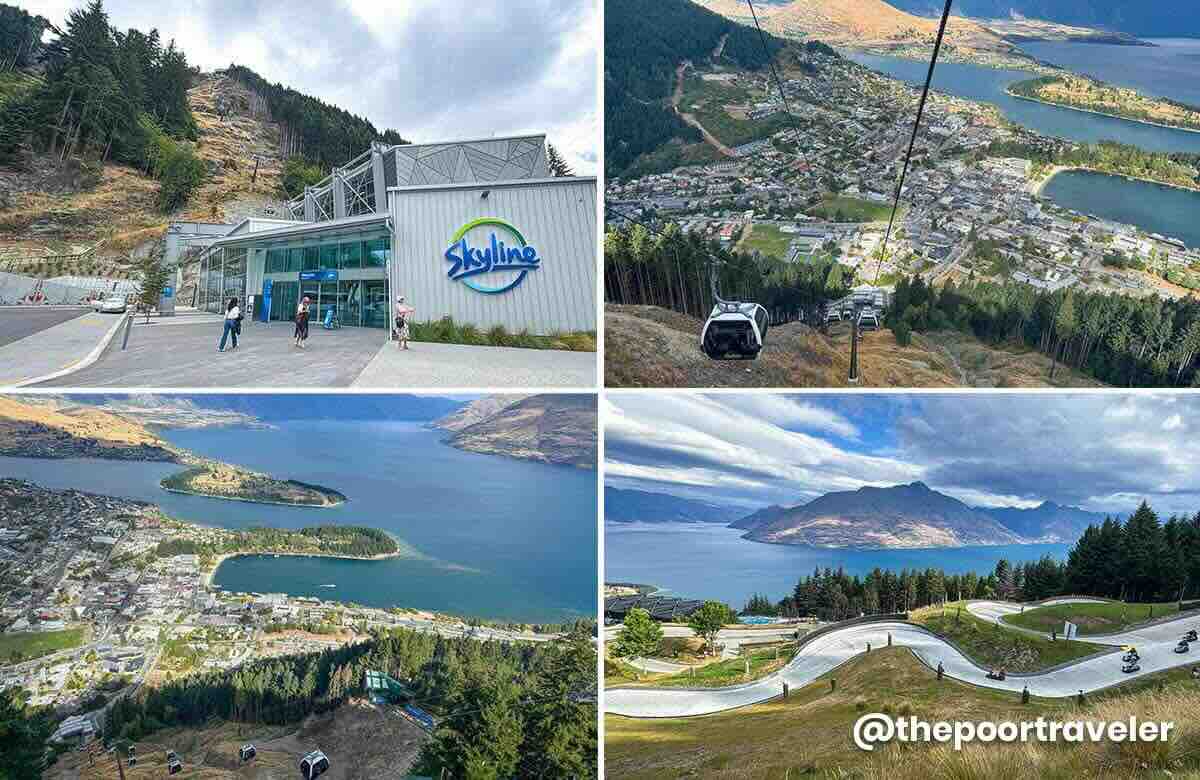
We then walked to Skyline Queenstown to ride a cable car to a lookout which affords awesome views of the city, Lake Wakatipu, and the surrounding areas.
This wasn’t our first luge ride. We’d tried it in Singapore and at Misibis Bay, but this was definitely the most scenic and exhilarating. The view alone as you zoom down the slope and negotiate the curves was phenomenal! We did it three times, but we felt like we should have booked the six-ride package instead.
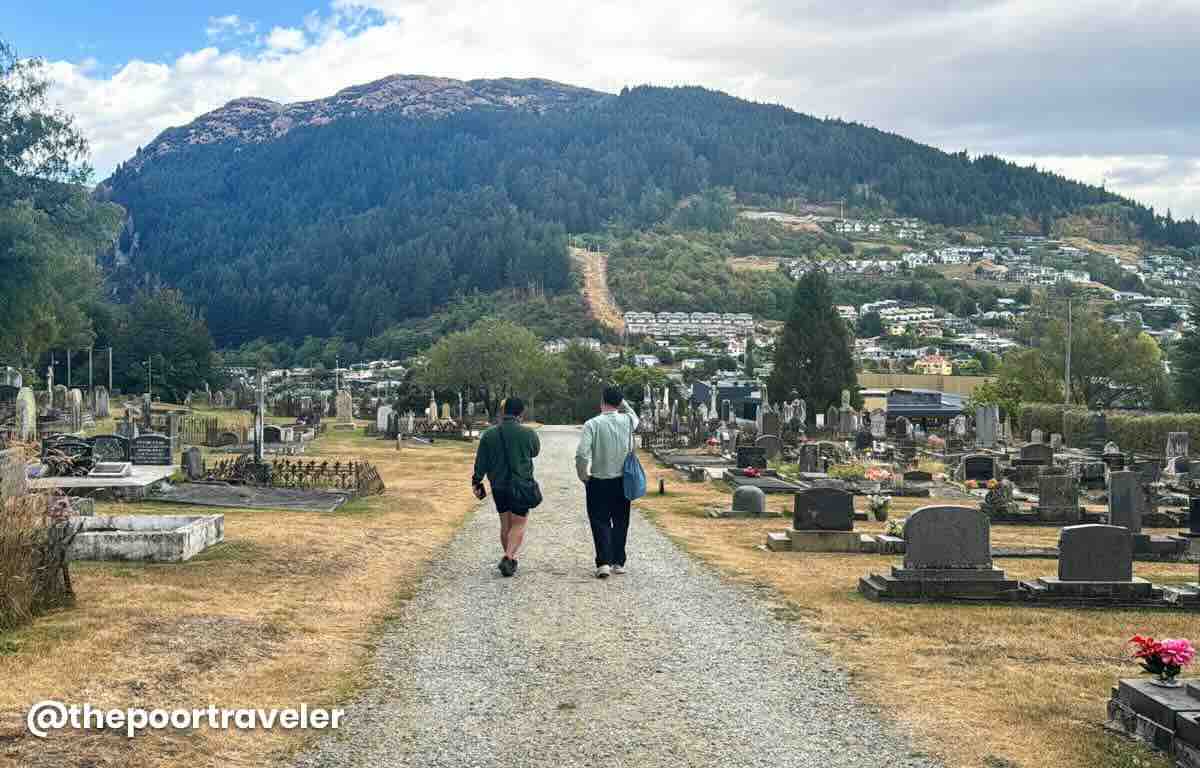
We boarded the gondola back down, and along the way, we passed by a cemetery. I love cemeteries so I convinced Ivan to check it out and explore with me. Apparently, this also marked the start of the popular Tiki Hiking Trail.
Back at the Steamer Wharf, after checking out souvenir shops and trying to get a table at the city’s top restaurants (most of which were fully booked that night), we ended up here at Flame Bar and Grill, which serves local New Zealand and also South African dishes. Its bestseller is the sticky ribs.
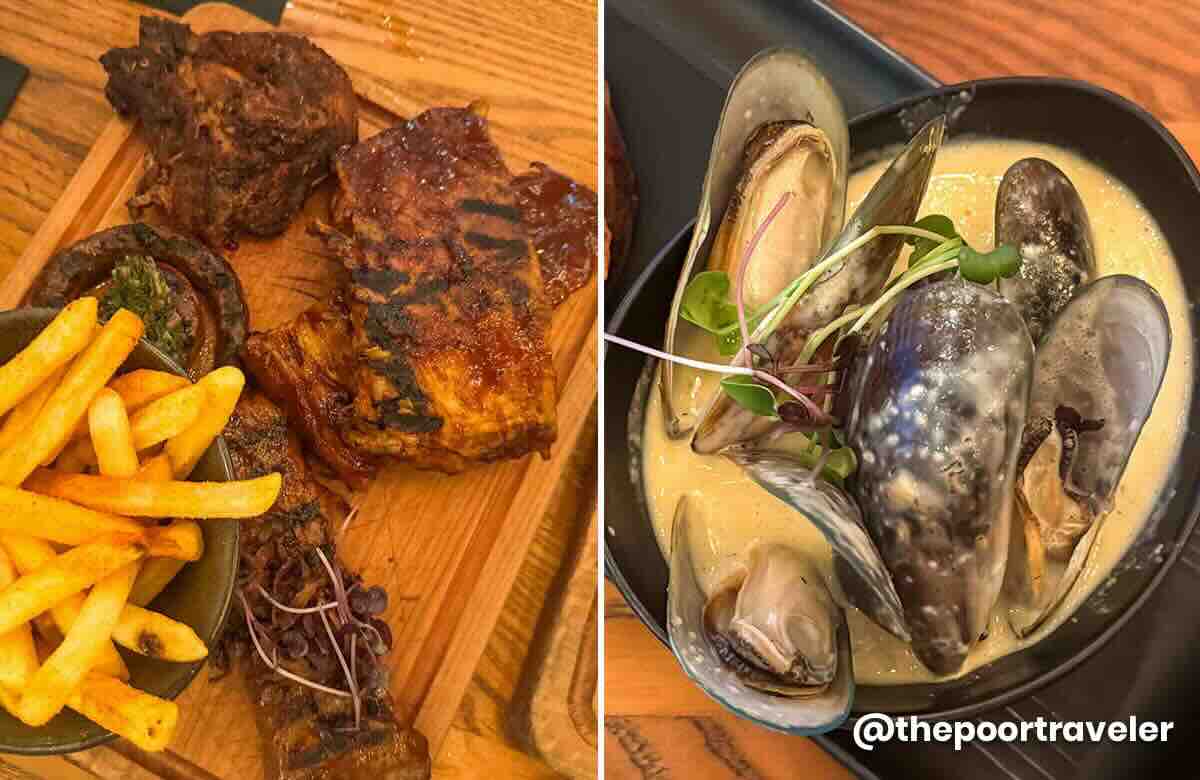
We ordered its Flame Mixed Grill platter. It was composed of signature ribs, sirloin steak, rotisserie peri-peri chicken and homemade Boerewors sausage.
Now, it was marked as good for one person, but I had a feeling it was too much for a single soul. So even if this restaurant had a one-meal-per-person policy, we asked if Vins and I could just share instead, and the staff said OK since I also added a small bowl of New Zealand’s native green-lipped mussels as appetizer.
At this point we had gotten used to the large serving sizes here in New Zealand, but we weren’t prepared for this one. It was a feast! Vins and I shared, right? But we still struggled to finish it all. We did finish, but the struggle was real. But it was our best meal in New Zealand. Every single thing on the table, even Krisa’s Mozambique prawns, was delectable.
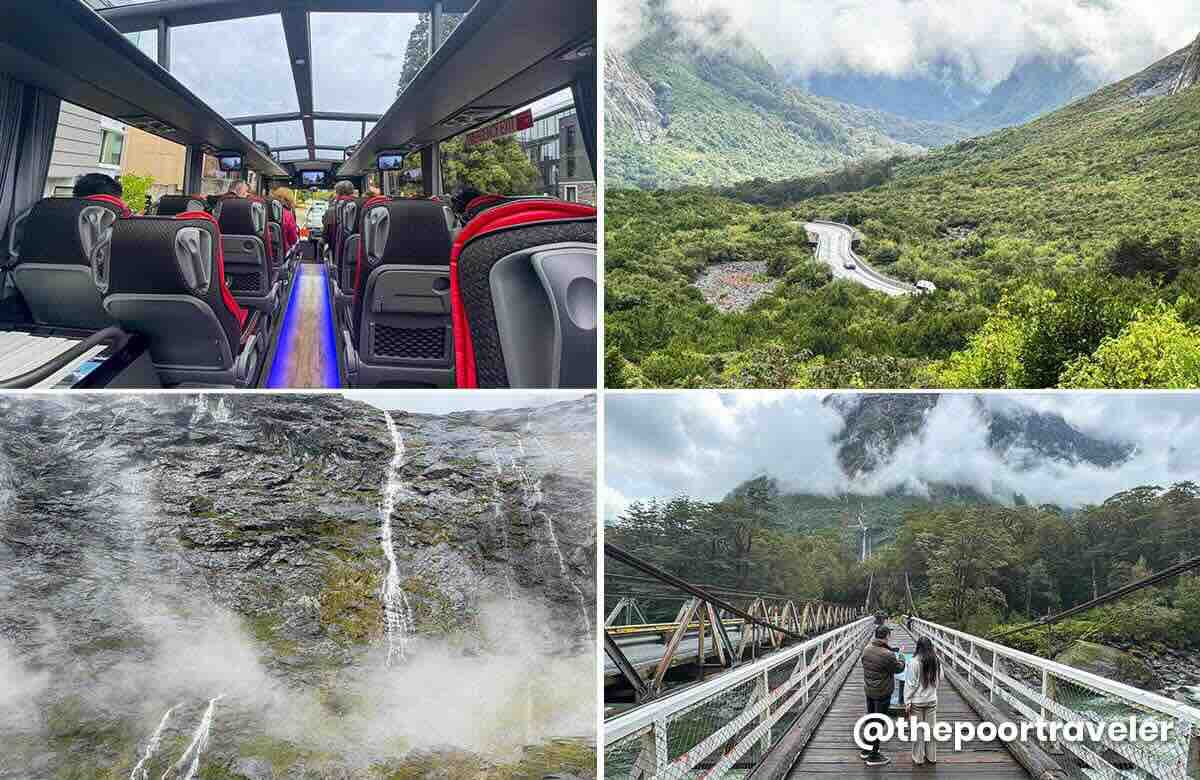
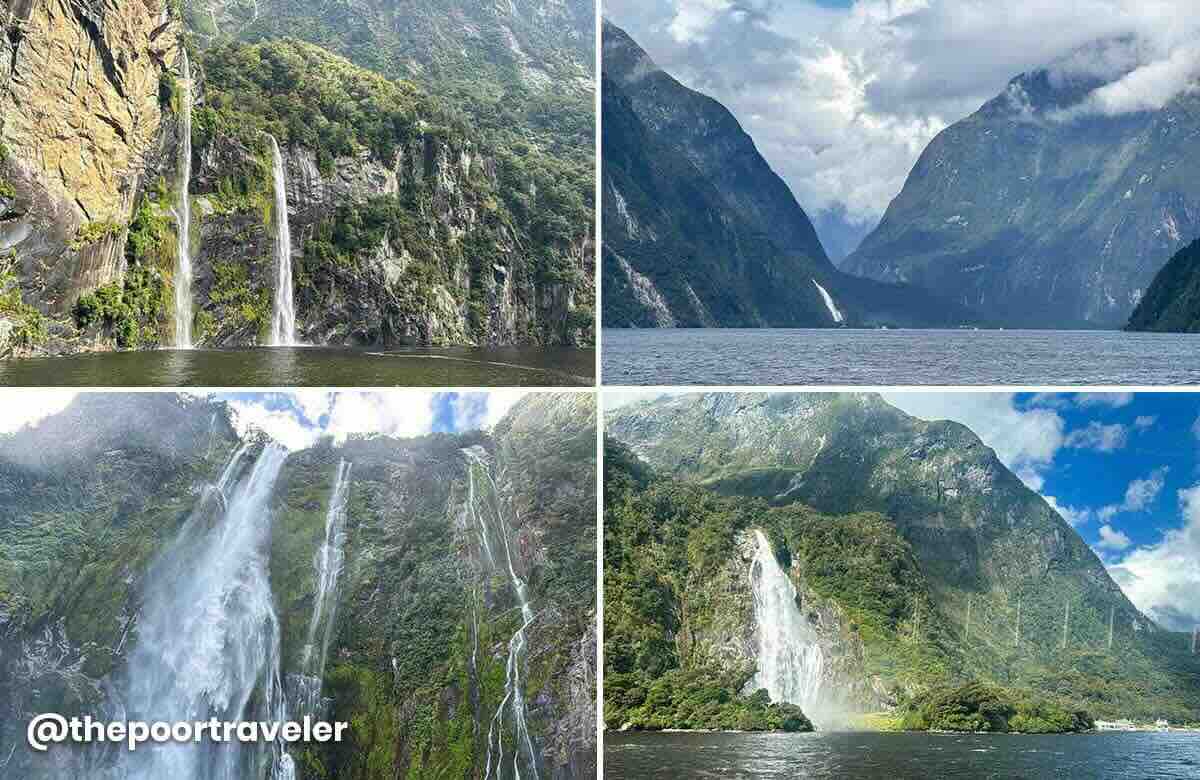
This was the day we’d all been waiting for! Milford Sound is probably South Island’s most talked-about attraction, and we were really excited to finally see it. We joined a group tour which used a bus with glass ceiling for full appreciation of the scenery.
Milford Sound is part of the Fiordland National Park and is roughly four hours away from Queenstown. So yes, we spent a lot of time on the bus, but with several stops along the way, including Tutoko Suspension Bridge, with a view of Mount Tutoko. But I think my favorite was the Hundred Falls at the Milford Valley Lookout. It was my first time to be surrounded by countless cascades all around. It was so surreal and magical.
Way past noon, we finally arrived at the Visitor Center by the pier, where we boarded a boat and began our cruise along the fjord, bombarding us with waterfall after waterfall after waterfall. At first we stayed on the top deck for the view, but when things got splashy, we decided to climb down to the cafeteria, where we had lunch, which was included in the package.
The whole cruise lasted almost two hours, from boarding to disembarkation. As soon as we hit land again, we were herded back to the bus to start our journey back to Queenstown.
We booked this on Klook. Below is the exact tour we booked.
It took us some time to find a dinner place because most restaurants were packed, but we ended up here at Mapo 88, a Korean restaurant tucked in one of the inner alleys. We had kimchi fried rice, honey soy chicken, and rabokki. Everything was for sharing, so we split the bill.
It’s our last full day in Queenstown, and today it’s just Vins and I. Krisa and Ivan had flown out earlier this morning. Our itinerary was more laidback today.
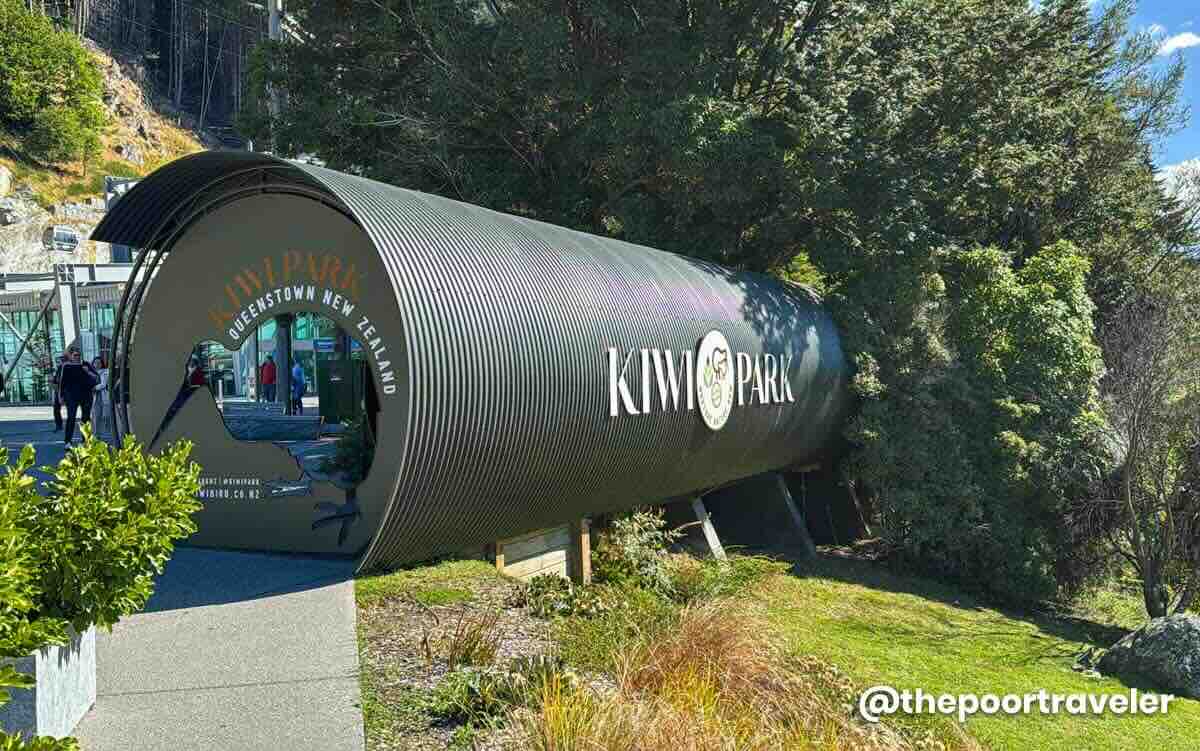
We realized, after nine days, we still had not seen any kiwi, which is perhaps New Zealand’s biggest icon. This morning, our main attraction is the Kiwi Park, which is just beside the Skyline Gondola Station. If you have fewer days, you can visit both Kiwi Park and Skyline within the same day. We didn’t do it that way because we were a bit hesitant as we’re not big fans of animal attractions. But in the end, we decided to still check it out.
Kiwi Park is a family-owned wildlife center. Established in 1986 on what was once an unofficial rubbish tip, the park has been transformed into a lush, five-acre haven. According the staff, the center is dedicated to the conservation of New Zealand’s unique native species, including, but not limited to, the kiwi.
There was a 30-minute conservation show, introducing some of its resident birds. But the kiwis were sheltered in a blacked-out building where photography was prohibited, so we didn’t have any pics or footage. Some of the birds were kept in enclosures, so if you don’t like animals in captivity, this might not be for you. But the place was informative and insightful.
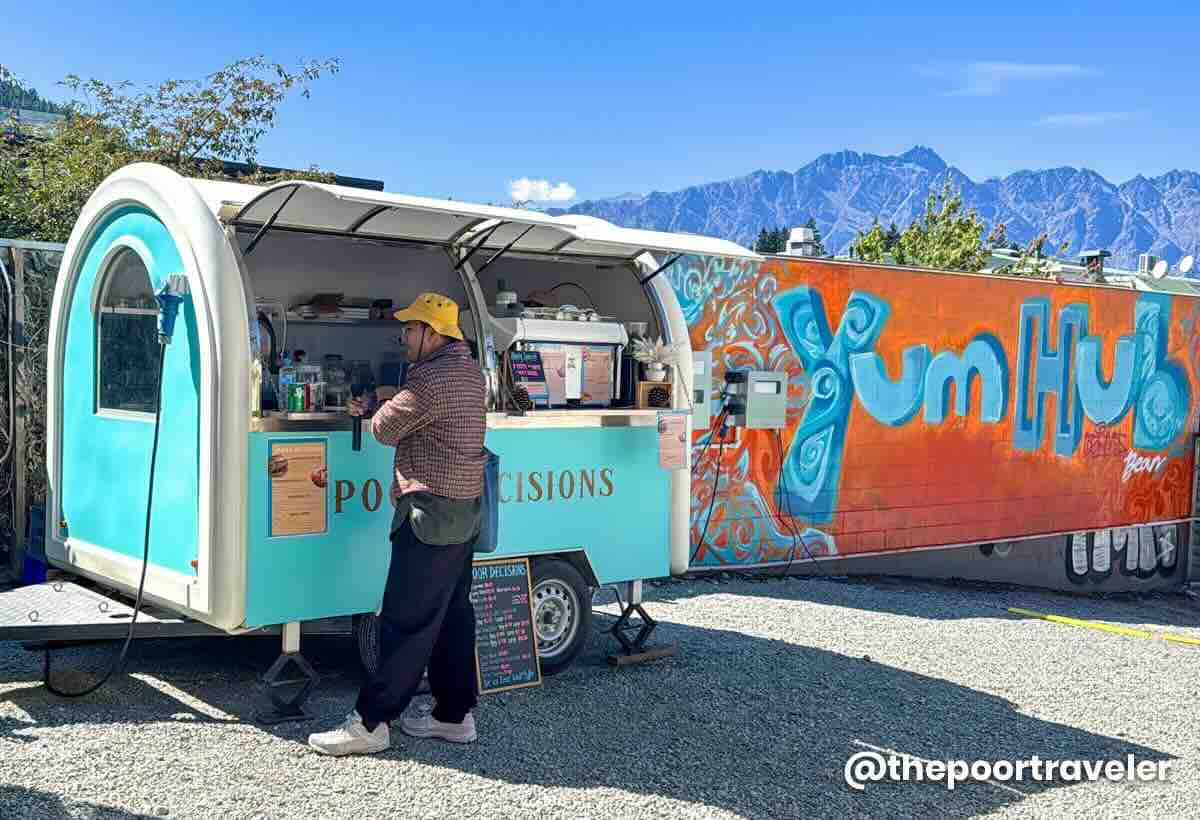
We then spent the rest of the day walking around the Queenstown Mall, shopping for souvenirs, and pigging out at the Yum Hub, which is a collection of parked food trucks serving diverse international plates. We tried FOGO (a Brazilian BBQ spot), Yonder (a popular café and restaurant), Cookie Time (a snack bar famous for its, well, cookies and hot chocolate).
We also returned to Patagonia to try another flavor of their famous ice cream.
Address: Rees Street and Camp Street, Queenstown 9300, New Zealand
DAY 10: DEPARTURE
Our flight out of New Zealand was scheduled at 7:00 AM, so we were up and about as early as 3AM. The airport terminal didn’t open until 4:00 AM, so we had to wait a bit before we could enter. The whole check in, immigration, and boarding processes were all so smooth and uneventful.
NEW ZEALAND BUDGET BREAKDOWN
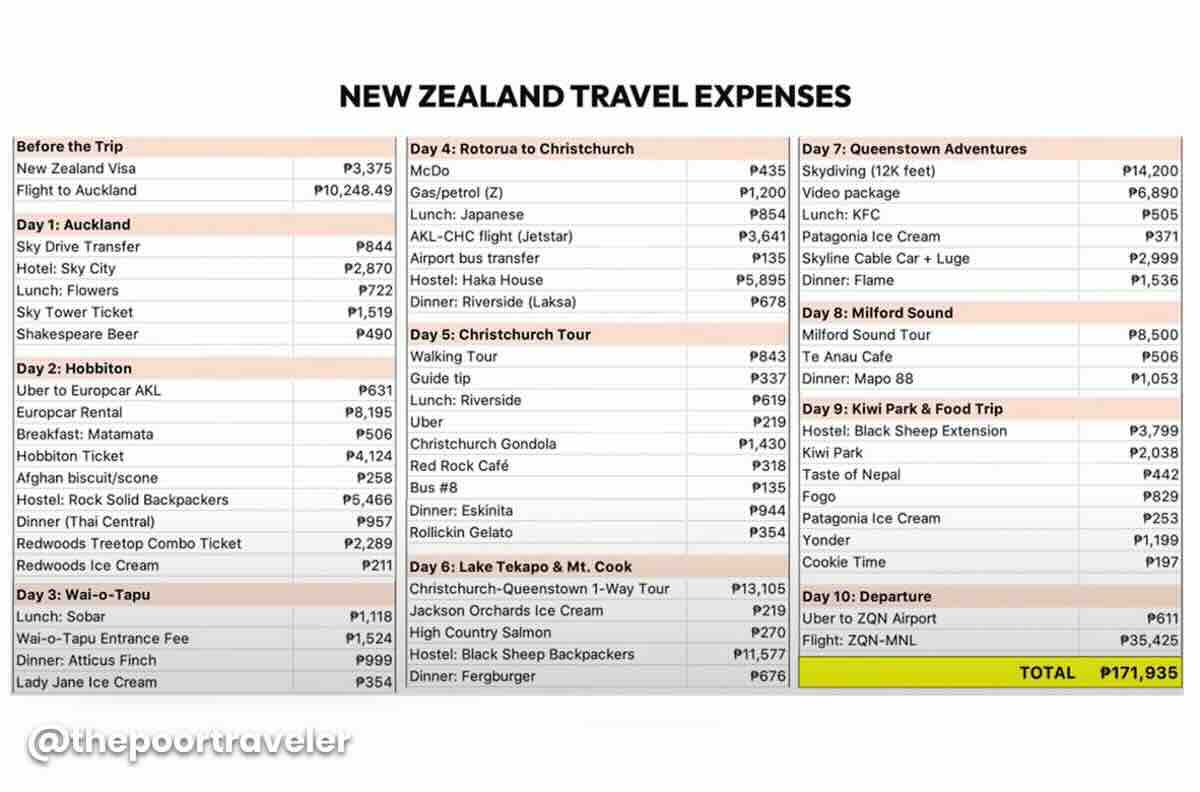
So, how much did we spend? By this time, you’ve probably noticed that it’s really expensive in New Zealand. I expected the cost of travel to be high, but I was still surprised because I didn’t think it would be this high.
For this itinerary, we spent a total of around P172,000 per person, inclusive of flights, hotels, tours, meals, and transfers. This was for 10 days, covering four cities and three additional day trips to other destinations. So, it was quite a packed schedule.
Almost P50,000 went to flights or airfares, and nearly P30,000 went to hotels. Again, this is per person. So, for hotels, we booked rooms for two and then split the cost between Vins and me.
Meanwhile, our friend Ivan had a different computation and ended up spending more because there were hotels where he didn’t have anyone to split the cost with. Also, we had different flights — his was MANILA-NEW ZEALAND-MANILA, which cost around P75,000. Ours, on the other hand, was MELBOURNE-NEW ZEALAND-MANILA since this trip was part of a greater Australia-New Zealand trip itinerary, so our flights only cost P49,000. But if we had taken the same route and flights as Ivan, our total would have been around P198,000, which is more expensive because our stay was also one day longer.
By the way, the conversions we’re showing you vary because we used different cards for our expenses — some were on Vin’s credit card, some on mine, and sometimes on my GCash. Whatever conversion rate we were charged, that’s what we recorded. When we couldn’t find the exchange rate, we used 33.7 to convert.
We also didn’t include souvenirs and alcoholic drinks in the computation. Hahaha! If you are a drinker, then you might want to add more to your budget.
You might have noticed too that we ate out often because there were a lot of restaurants we wanted to try. If you’re on a budget, you can still cut costs by sticking to cheaper dining options, buying food from the supermarkets, or grabbing quick eats from convenience stores.
Again, all the tours and hotels we booked and recommend are compiled in the TPT Masterlist for your easy reference. Just visit www.thepoortraveler.net/masterlist.
Have Peace of Mind While Traveling!
Getting a travel insurance is optional, but we highly recommend this, especially when traveling abroad. Travel can be unpredictable, and though we hope we’ll never use it, having it gives us peace of mind in case of unexpected delays, cancellations, or emergencies.
For international destinations, consider PGA Sompo’s TravelJOY Plus insurance. You can GET IT HERE. Don’t forget to use WORTHIT for a special affordable rate.
The technical storage or access is strictly necessary for the legitimate purpose of enabling the use of a specific service explicitly requested by the subscriber or user, or for the sole purpose of carrying out the transmission of a communication over an electronic communications network.
Preferences
The technical storage or access is necessary for the legitimate purpose of storing preferences that are not requested by the subscriber or user.
Statistics
The technical storage or access that is used exclusively for statistical purposes.The technical storage or access that is used exclusively for anonymous statistical purposes. Without a subpoena, voluntary compliance on the part of your Internet Service Provider, or additional records from a third party, information stored or retrieved for this purpose alone cannot usually be used to identify you.
Marketing
The technical storage or access is required to create user profiles to send advertising, or to track the user on a website or across several websites for similar marketing purposes.


:max_bytes(150000):strip_icc()/TAL-header-provincetown-massachusetts-PROVINCETOWN0725-94aa031942cb48fb82010d3306e505eb.jpg "How to Spend the Perfect Day in Provincetown")
:max_bytes(150000):strip_icc():format(jpeg)/TAL-header-provincetown-massachusetts-PROVINCETOWN0725-94aa031942cb48fb82010d3306e505eb.jpg)









:max_bytes(150000):strip_icc()/tal-amazon-roundup-travel-mistakes-how-not-to-make-them-former-travel-agent-tout-ab7322f6d48b4270ad62c050a31d47d0.jpg "10 Things to Skip Packing for Europe")
:max_bytes(150000):strip_icc():format(jpeg)/tal-amazon-roundup-travel-mistakes-how-not-to-make-them-former-travel-agent-tout-ab7322f6d48b4270ad62c050a31d47d0.jpg)